Posts

Sunset Photo Shoot

Image
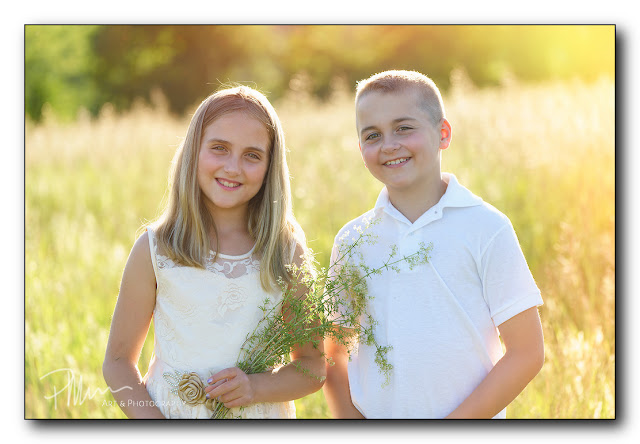
W e did a photo shoot with Lukey and Kenzie at sunset last night.  At around 6:30 yesterday evening, we headed out for a nearby grassy field where I could put the setting sun behind them.  It worked out fairly well and the kids learned a little bit about the real difficulties of modeling.  The kids learned that good modeling is about knowing which angles and poses work well for you...  about knowing how to express a natural smile and not a forced plastic goofy smile...  about knowing which clothes make you look good...  it is about knowing what to do with your eyes, your hands, your feet, your chin, every part of your body.  What they learned is that modeling is not about simply being a beautiful, attractive person and just standing there but that modeling is actually a verb that requires a lot of knowledge, skills and abilities.   This was good practice for me too.  I haven't done any sort of photo shoot in about two years or more.  Shooting portraits with the sun behind your mode

First Dinner Guests Post-Vaccination

Image
T oday, we will be having our first dinner guests since getting vaccinated.  I was finally fully vaccinated this past Wednesday which was two weeks after my second dose of the vaccine.  Sheila was fully vaccinated a week before I was fully vaccinated so she was already good to go.  So, today, we'll be having Sheila's parents over for dinner. Yesterday evening, Liza and the kids stopped by for maskless hugs.  They stayed long enough for Lukey and I to play a few rounds of golf in the backyard.  Afterward, the kids played with the walkie-talkies learning a bit more about aviation/military radio etiquette and terminology.  They even chose callsigns for each other...  Lukey is "Hockey Puck" and Kenzie is "Skater" and the playhouse is "Playhouse Ops".   Back to tonight's dinner... our dinner will be barbequed shish-ka-bob consisting of tender steak, potatoes, red onions, green peppers, cherry tomatoes, fresh mushrooms and a couple of skewers of fres

Bench for Mudroom

Image
I 've been saying for years that I want to make a bench for our mudroom.  It would be nice to be able to sit to put on our shoes and boots rather than have to balance on one foot.  After my recent ankle re-injury (and months-long recovery...  it is still recovering) and now a knee injury (yes, I'm old after  physically abusing my body for decades), this bench project was moved to the front burner.  Both Sheila and I are tired of the physical balancing act as we attempt to put shoes on at the door. Another reason it was time for this bench project is because lumber is scarce and the little bit of lumber that can be found is a bit pricey.  This has put all the larger home improvement projects in a holding pattern for now.  I was thinking that I had enough scrap lumber lying around to build a pretty nice bench so it was time for this "little" project.  On the positive side, this project would also allow me to put a dent in the scrap lumber inventory I have lying around!

Homemade Corned Beef Hash

Image
I noticed that corned beef briskets were on sale at Shaw's a couple of weeks ago so I threw one in our cart.  I had been wanting to make some homemade corned beef hash for a long time and this seemed like the time.  We rarely see corned beef in our supermarket and, when we do see it, it is often priced so highly that I was quick to grab one while it was available at a reasonable price.  Homemade corned beef hash is actually nothing like the cans of corned beef hash you see on the shelves in the supermarket.  Those cans taste more like deviled ham combined with spam which is nothing like real corned beef hash.  Our supermarket has two brands of canned corned beef hash...  Libby's, which tastes more like cat food and consequently I find inedible and should always be avoided or, Hormel, which tastes more like some deviled ham/spam combo.  I was having a craving for real corned beef hash so I needed to make some myself. I put the corned beef brisket in the oven on Saturday morning

Eye Back to Normal

M y right eye is back to feeling normal again so I guess my scratched cornea has healed.  It was quite painful for a while! In the beginning of the pain, I didn't remember doing anything that could have caused a scratched cornea.  Then one evening when I was tending to my eye in front of the bathroom mirror, I did something that reminded me exactly of what caused my scratched cornea.   I had picked up my eyeglasses with one hand because the eye drops were in my other hand.  Usually I use two hands with my eyeglasses so that I don't cause bent lopsided eyeglasses.  This time I had the eye drops in one hand and tried putting my eyeglasses on my head with the other hand.  I suddenly remembered that I did the same thing a few nights previously... Back a few nights previously, I had something else in my right hand when I attempted to place my eyeglasses on my head with my left hand.  Unfortunately, I misjudged distance and I poked my right eye with the right temple tip of my eyeglas

More Tulips Bloomed

Image
M ost of our 50 tulips have bloomed in our playhouse gardens.  We have two new gardens flanking each side of the steps leading up to the playhouse.  Kenzie and Gee did a good job at planting last fall.  Thanks to Will and Sue's gift of tulip bulbs and Gee and Kenzie's work, we now have two very colorful tulip gardens in front of the playhouse! A few days ago, we started to worry about whether this tulip garden idea would work in this location.  The few tulips that had bloomed weren't looking all that healthy.  They were wilting a bit and the long leaves were sort of curling over.  Actually, even those that hadn't bloomed yet weren't looking too healthy either.  So, we were a bit worried. We weren't sure if maybe there is too little sun (which is true since these gardens are under a big tree) or if these young tulips were already somehow diseased in some way.  I determined that the soil may have been a bit too wet especially for two gardens that are mostly in sha

Homemade Pier Extension Completed

Image
I finished my homemade telescope pier extension project today and it seems to be working as planned. There isn't a whole lot in life that is more satisfying than designing something in sketches in a notebook, then building each individual part yourself, then assembling all the parts and finding that everything works just as designed and planned! My primary problem that prompted this project was that my longer telescopes would hit the tripod legs when viewing almost straight upward.  Also a factor in my decision is that my astronomy tripod isn't tall enough for my longer refractor telescopes which meant I would need to sit down very low on the ground to see into the eyepiece.  I needed a pier extension to raise the mount and telescope higher.   Some may ask why I don't just extend the legs fully to gain some overall height but this is a bad idea for two reasons.  First, it will do nothing for me to resolve the telescope colliding with the tripod legs.  And next, the more yo

Tulips Beginning to Bloom

Image
T he first of our 50 tulips has bloomed today!  Kenzie, our playhouse gardener, will be happy to see it in person.  For now, this photo will have to do.  Gee showed this first tulip to Kenzie this afternoon during their daily video chat but seeing it in person will be much, much nicer though.   It will be interesting to see how many different colors we get.  So far, we are seeing only yellow and what appears to be red.  It looks like that red one next to this yellow one will be the next to bloom...  probably tomorrow...

Small Tasks

Image
O ther than preparing dinner like I usually do, I accomplished one small task this evening.  As I mentioned in a previous blog entry, I designed a telescope mount pier extension and I am in the process of building it.   When I wrote that blog entry, I had just spray painted the parts and was waiting on them to cure.  I waited about 48 hours and then started on the next step. I have six 1/4-20 threaded inserts that need to be inserted into six holes.  I had pre-drilled these holes before painting but I hadn't double checked the depth of the holes...  I simply eye-balled it.  Well...  as luck would have it...  these holes were not deep enough so it was back to the drill press. This evening, I drilled those six holes about a 1/4" deeper.  These inserts fit perfectly now.   The next step will be to drill holes in the 4-1/2" x 12" pipe that is the actual extension.  I have six corresponding holes to drill in that pipe.  I marked those holes this morning so the pipe is now