Posts

Showing posts with the label solar astronomy

Short Solar Session

Image
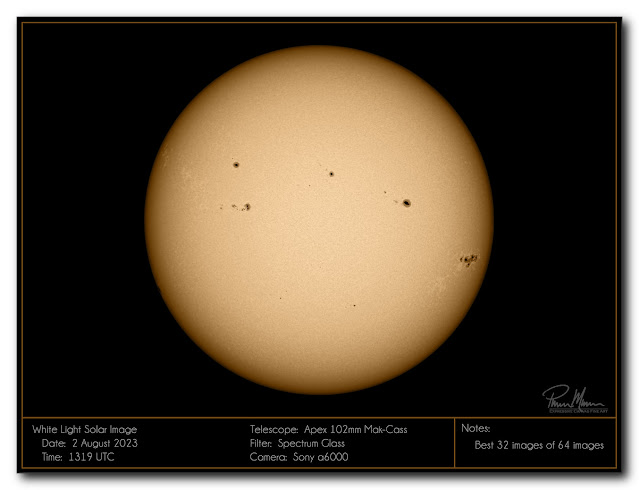
W hen I got up this morning, I immediately noticed that the sun was streaming in our windows and it was a color of light that we haven't seen in quite a while.  It took me a few seconds to recognized it but it was normal, bright sunshine not discolored nor diffused by smoke!  When I peered out the window, I noticed that the sky was a nice blue!  My first thoughts were that I should take advantage of the rare good weather to do some solar astronomy.   Unfortunately, my spine still has not fully recovered from my latest spinal problems that left me crumpled on the bathroom floor a few days ago.  This meant that I would need to keep my astronomy gear to a minimum to limit the amount of gear I would need to lift and carry outside.  So, I decided to go back to basics with simple gear.   I chose my smallest telescope (physical size)...  my Apex 102mm Maksutov-Cassegrain.  I chose my simplest solar filter which is a glass filter that mount...

Made Some Progress This Morning

Image
I did some more work on the custom spectroheliograph yesterday but I seemed to only make things worse.  It was definitely one of those days!  I had started over with the entire process of assembly in an attempt to eliminate the little problems I was still seeing but I seemed to introduce even bigger problems than the ones I was trying to resolve.   I think part of my problem and the one that was the most time consuming of all the problems was a software problem.  At some point, a red box was moving around on the screen as you can see in the image below.  The box would scroll right...  then left...  then up...  seemingly for absolutely no reason at all.  At first, I was wondering if it was some border around the holographic grating to indicate my alignment was way off.  I swapped cameras and the problem disappeared so I then knew it was not a problem with my instrument.  I then tried the original camera using different software ...

National Solar Observatory

Image
I mentioned in a previous blog entry  that I had compared one of my solar images to the images captured by the National Solar Observatory in El Tiede, Spain and I shared comparison images.  While I was lying in bed last night, I got to thinking that perhaps I should provide more information about the National Solar Observatory.  It seems silly to mention this and not explain it a bit. The National Solar Observatory (NSO) is a research and development program funded by the US.  Generally speaking, its purpose is to advance our knowledge of the physics of our sun.  The NSO isn't actually one physical observatory but a network of observatories around the globe that are constantly collecting data on our sun. In yesterday's blog entry, I compared my quick and dirty Hydrogen alpha image to the Hydrogen alpha image captured by the NSO Integrated Synoptic Program's Observatory in El Tiede, Spain.  This NSO Integrated Synoptic Program (NISP) consists of six observin...

Custom-made Spectroheliograph

Image
L ittle by little, I've been working on building a custom homebuilt, non-commercial spectroheliograph for solar astronomy.  A spectroheliograph is a scientific instrument used for imaging/graphing the sun in one specific wavelength at a time.  It is not an instrument for visual observations though.  It is used to capture any single wavelength between 400-700nm at a very narrow 3 angstroms (0.3nm) in graphical waveform.  Then specialized software is used to transpose that waveform into an image.   This particular spectroheliograph was designed by Christian Buil in France.  He kept this particular design small and relatively simple for do-it-yourself amateur astronomers such as myself.  I believe he also has spectroheliograph designs that are research-grade and costing tens of thousands of dollars.  I opted for the dirt-cheap do-it-yourself and a-little-more-difficult route to build what is considered a beginner spectroheliograph.  It is s...

Configuration for Full Disk Solar Observing

Image
I had written previously about finally finding a configuration of gear that makes full disk solar observing far more enjoyable than without this new configuration of solar gear.  The purpose of this blog entry is more about documenting this new and unusual configuration so I can duplicate it again each time I want to observe the full disk of the sun with my Quark solar filter.  Of course, I have this configuration documented in my notes too but I figured it would be good to document it here as well.   My larger telescopes provide more closeup views but I like to see the whole disk as well.  In order to improve my full disk view, I had to play around with a few ideas on how I could possibly accomplish this.  I kept going back to my assortment of astronomy components to assemble different configurations.  Then I had to play around with spacing.  It was a fairly long process of trial and error based upon the knowledge I had gained through experience...

Solar Images from this Summer

Image
T wo or three times a year, I put together a small photo book of photos I have shot documenting some of the things we've done so I can send it to my father.  We haven't traveled at all since the beginning of the pandemic and we are still in no hurry for that.  Well...  we would like to travel but the risk is still too great.  I've already had the virus three times and I am still experiencing lingering problems due to the virus so I'm in no hurry to expose myself further.  My health was bad enough before these lingering problems due to the virus.  I don't need to continue to expose myself and my health to more problems. While I was sorting through photos and choosing photos to put in this photo book, I came across some of my solar images from a session in July that were worth writing about here in my blog.   I specifically remember this particular session because I was able to watch a solar flare erupt and recede for about an hour.  It was a p...

Solar Astronomy Camera

Image
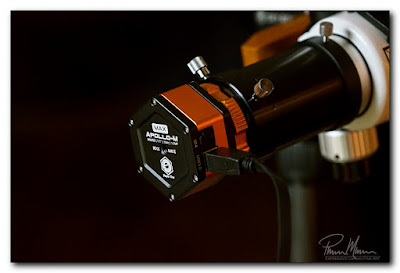
I finally purchased a much needed dedicated solar astronomy camera and it arrived last night!   I've been using a sort of generic beginner astronomy camera (well...  maybe one step above entry level) meant primarily for guide scopes and planetary imaging.  There are far worse cameras than the one I've been using until now but this camera is not really an ideal choice for solar imaging.  It has been slow, difficult to use, noisy, and the image quality has been seriously lacking.  Producing good results out of this old astronomy camera has been difficult, frustrating and requiring a lot of extra post-processing.  I've had to work very hard at finessing fine detail out of the images and I've only managed to succeed at doing that because of my decades of photography experience.  I admit that I've managed to produce some nice imagery with the old camera but it has been difficult to accomplish requiring a lot of extra work and time.  Plus, much of...

Homemade Solar Flat Caps

Image
O ver the past week, in between bouts of lousy health, I have been working on making two homemade solar flat caps.   A flat cap comes in handy when imaging the sun.  The flat cap will diffuse the view for images that are called "flat frames".  These flat caps are placed over the front end of the telescope, temporarily, to shoot these flat frames.  The flat frames are then divided into the stack of normal image frames.   A good flat frame will allow me to create even light across the frame (solar filters create mildly uneven light across the frame).  It will also help to eliminate any dust specks on the image files.   Of course, keeping the camera's sensor clean also eliminates specks and blobs of dust but using a flat frame is another process to effectively smooth out many of these types of defects in the solar image stacks.  This little project called for scrounging up various household materials and some hobby tools.  I alway...

Peace of Mind and Solar Observing

Image
I 'm still down for the count with some sort of bad cold or virus so I'm not doing much (yet still testing negative for COVID...  I don't believe it though).  Whenever I attempt to do something, such as walk across a room, I start coughing and coughing and coughing.  So, I'm sitting in the house trying to figure out what I can do. The sun was shining in between lots of scattered clouds which reminded that the last time I had my good solar filter out (the other day) it did not work.  I saw no detail and then noticed that my power LED was not illuminated.  I made an assumption that my battery was the issue but I had not tested the filter again, visually, since then.  I figured that since I wasn't doing much this morning that perhaps this would be a good time to set up a telescope to test the filter.   This particular filter is a specialized hydrogen alpha filter but is really considered an "entry level" filter but that doesn't mean it is at a budget...

A Solar Astronomy Session with Lukey

Image
I t was a very rare beautiful day yesterday.  Lukey and Kenzie were with us for the day too.  The moment I saw how clear the sky was on this morning, I knew I should be setting up for some solar astronomy at some point during the day.   Because of trees around our house, I have only a relatively short window of opportunity the first thing in the morning and then a relatively short window of opportunity in the early afternoon for solar astronomy.  Two short windows of opportunity are better than no windows of opportunity though.  The sun would be behind trees all the rest of the time.  I chose to set up for solar astronomy first thing in the morning before Lukey and Kenzie even arrived at the house.   I knew that if I waited for early afternoon, then I'd likely have to contend with wind.  When it comes to astronomy, wind can be as limiting as clouds so I knew that my chances of a good session were during that early morning window of oppor...

A Half Hour in Hydrogen Alpha

Image
The sun was shining this morning so, on my way to the bathroom for my morning cleanup and visit, I immediately turned on my new Ha (hydrogen alpha) solar filter so it could warm up.  This particular filter requires power to keep the etalon (interference filter) at the optimal temperature so I can see the most details.  The wavelength band varies very slightly by controlling the temperature of the etalon.  The more finely tuned the temperature setting, the more details you will see.  The filter requires about 10 minutes to warm up so I turned it on before washing up and brushing my teeth so it would be ready when I was ready for the day. I then headed out into the frigid single digit temperatures (just like the other morning) with the battery pack in my pocket and the telescope and mount in my hands.  I carefully made my way down to the end of the icy driveway where I have an unobstructed view of the sun quite low in the southeastern sky. I had far more success a...