Posts

Showing posts with the label mount

Upgraded New Solar Mount

Image
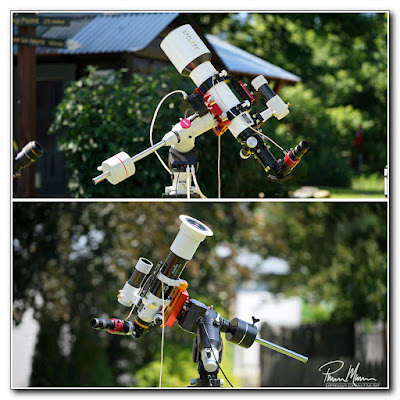
The new saddle for my new SolarQuest mount arrived this morning...  finally (USPS shipping is horrendous) ...  so I spent a little time upgrading the mount this morning.  I did a bit of work upgrading it yesterday too but I had been waiting for this new saddle to arrive for quite a while and I finally got that done this morning. In the photo, below, you can see the original saddle that came already installed on the SolarQuest mount.  I've had some bad experiences with this type of saddle...  the cast aluminum tends to crack and break eventually, the single bolt damages dovetail bars, and the single bolt isn't a secure as it should be...  so I wanted to replace it with a better one to keep my telescopes as secure as possible. In this next photo, you can see the new replacement saddle.  It is a much heavier duty saddle and it is actually a large clamp to hold the telescope rather than just a single bolt holding the telescope in place.  Replacing this saddle was easy when the new

Small Maintenance Tasks

Image
I 'm still feeling rather lousy and coughing whenever I move so I'm laying low at home.  This morning, however, I accomplished a few small maintenance tasks on my astronomy gear.   First, I wanted to install a better saddle on my newly converted EXOS2 manual mount (photo at right).  I don't care for saddles with a single bolt holding my telescope on the mount.  I prefer two pressure clamps holding my telescopes.  I had ordered an appropriate saddle a few weeks ago and it arrived this past week.  I just needed to drill a hole and then assemble it so that was a small and easy task that proved to be unremarkable.  Then I moved to my best telescope.  My Explore Scientific 102mm APO refractor recently developed a sticky focuser.  It wasn't sticking to a complete stop but it was not as smooth as I like it.  Any bit of stickiness in the focuser causes some vibration in your view so I new I wanted to resolve this little problem before I got worse.  This task was a little more i

New Telescope Mount is Incredible

Image
Old mount on top, new mount at bottom. I already wrote about my problems with my old primary telescope mount so I won't get into the specific issues I have been experiencing with that old mount here in this blog entry.  A couple of days ago, I was able to take the new mount out for a spin out under the sky for a bit of visual solar astronomy and I was very pleased.  This new mount is simply incredible by comparison and is a tremendous upgrade from the old mount!  It worked exactly as it should from start to finish.  There were no unpleasant surprises nor any frustrations with the mount itself whatsoever.   Whenever I used my old mount, my focus seemed to be more on the mount and its quirkiness rather than the object I was trying to view or image.  These quirky traits could easily be justified as truly being faults and poorly written code.  The term quirkiness is just a bit kinder and gentler.  Really though, that old mount has always had many frustrating faults most of which I di

Last Day of Imaging with Old Mount

Image
A s I mentioned in a previous blog entry, last Saturday was my last day of imaging with what was, at the time, my best telescope mount (see photo, at right).  At the time, it seemed like the electronics were toast so that put an end to this last imaging session within a short few minutes.  Then I spent the next few hours trying to figure out exactly what was wrong with this mount. Even after a few days, I still had not fixed the mount because I still had no idea what could be wrong other than perhaps a piece of obsolete and no-longer-available electronics failed so I ordered a new mount.  The mount I ordered was the newer and significantly improved version of this older mount.  The advantage of purchasing the same (but improved) mount is that I wouldn't need to purchase any other associated accessories because this new mount would fit everything I already own.  It would fit every tripod, it would fit my telescope pier with no adapting necessary, and all my associated accessories wo

Broken Telescope Tripod Fixed

Image
I 've been waiting for some new leg brackets to arrive from England so I could fix the tripod for my little Celestron CG-2 telescope mount.  One of the brackets that holds the legs in place broke about two weeks ago.  This mount is no longer available new so finding brackets was a bit of good luck!  (The new bracket can be seen in the photo at right.) I briefly contemplated just purchasing a newer and better manual mount to replace this broken one.  I had recently upgraded this little manual mount with a new saddle as well as installed ball bearings on both axes.  This upgrade project required a bit of time and effort.  I had cutting and grinding to do...  drilling and tapping to do...  and I had to find the exact right ball bearings to fit each axis.  After my upgrade, this mount was really working very well up until this little bracket broke.  Admittedly, having a newer and slightly better manual mount would be advantageous but, since I had already put so much effort into improvi

Broken Telescope Tripod

Image
W hen I brought my telescope and mount outside the other day to do some solar observing, a leg bracket broke on my tripod as I was opening up the tripod legs.  This bracket holds the leg in place when it is in use and the tripod is useless with a broken bracket.  My day wasn't starting out too well. I wanted to use this particular telescope mount because it has slow motion control knobs.  These slow motion controls make it easier to keep the sun in the center of my view.  As I slowly turn one knob, the sun stays in the center of my view.  Now I had to move the telescope over to another small mount.  I went back to my new-ish Alt-Az manual mount.  I really wanted to use those slow motion controls for this session though so this was a bit of a letdown.  Having another thing break and added to my to-do list was an even bigger letdown.   As you can see in the photo, the tabs that hold the spreader bar snapped off.  I had fairly recently rebuilt this mount with ball bearings and a bette

Small Astonomy Project

Image
W e've done a lot of walking over the past week which has resulted in my ankle and knee swelling up again so I'm laying a bit low lately.  To recap, back in January, I first sprained my ankle badly enough that I could not put any weight on my left leg at all.  That required about four months to heal well enough to do some things again.  However, the four months of hobbling around with all my weight on my right leg only resulted in a sprained MCL (medial collateral ligament) on the side of my right knee.  The knee injury was mostly better until we did miles and miles of walking this past week.  Now my knee is painful and swollen again so I am now back to ice and elevation for a good chunk of each day.  My left ankle is a bit painful too but nothing like my right knee. Putting my health problems aside, I always try to accomplish something, anything, each day.  Mostly, I've spent my time at the piano lately but I have managed to squeeze in a few other little things too.  Time

Homemade Pier Extension Completed

Image
I finished my homemade telescope pier extension project today and it seems to be working as planned. There isn't a whole lot in life that is more satisfying than designing something in sketches in a notebook, then building each individual part yourself, then assembling all the parts and finding that everything works just as designed and planned! My primary problem that prompted this project was that my longer telescopes would hit the tripod legs when viewing almost straight upward.  Also a factor in my decision is that my astronomy tripod isn't tall enough for my longer refractor telescopes which meant I would need to sit down very low on the ground to see into the eyepiece.  I needed a pier extension to raise the mount and telescope higher.   Some may ask why I don't just extend the legs fully to gain some overall height but this is a bad idea for two reasons.  First, it will do nothing for me to resolve the telescope colliding with the tripod legs.  And next, the more yo

Telescope Mount Pier Extension

Image
A s usual, whenever my health allows, I tend to be working on a few projects at the same time.  At the moment, I'm working on making a couple of aperture masks for one of my telescopes, I'm doing some landscaping around the house, I'm making some small springtime repairs around the house as I come across them, I'm repairing the grill in our outdoor kitchen, and I'm designing and making a telescope mount pier extension.  This particular blog entry is about the pier extension project thus far.   Quite often, especially if I use one of my longer refractor telescopes but it is not limited to this one telescope, I find myself wishing I had a taller tripod for my telescope mount.  Sometimes, even when sitting on a very low stool, I need to get my butt off the stool and sit on the ground because the eyepiece is closer to the ground than my eye in a sitting position.  If I use my longest refractor telescope, the telescope will even hit the tripod legs when pointing at or ne

Successful Rebuild and Upgrades

Image
The upgraded Celestron 70mm telescope.           I've already written a few times about rebuilding this particular little telescope but I added another part recently so it is worth writing about again.  As purchased, this scope was a hunk of junk. Celestron should be embarrassed by all their sub-$400 telescope packages because they are all worthless as sold. I suspect a lot of people end up getting turned off to astronomy as a result of being disappointed by purchasing a lousy, frustrating telescope. Only the very determined will continue this hobby after becoming frustrated beyond belief. I bought a Celestron 114EQ for our son a number of years ago. We quickly realized that this particular scope was not ideal for a beginner and we never got any decent views out of it so, the next Christmas, I purchased a simpler Celestron 70AZ. This telescope wasn't much better than the 114EQ but I felt it had potential for various reasons not worth explaining here.  This telescope