Posts

Showing posts with the label kitchen

New Refrigerator

Image
Our new refrigerator arrived today, as scheduled, so that is a bit of good news during perhaps the worst start of any new year in my life.   The furnace broke down in the middle of the night in late January and now needs to be replaced.  The refrigerator broke down and needed to be replaced because it was beyond repair.  Sheila's mom is in the hospital with a fractured spine, Alheimer's, and now COVID.  Sheila's dad also now has COVID.  I spent some time in the hospital and I need to head back to the hospital next week for a bone marrow biopsy.  My health is still rather poor with continued problems that had landed me in the hospital about a month and a half ago.  It really has been a miserable start to the new year. Just as I finished shoveling the deck and snowblowing in preparation of this refrigerator delivery, the truck pulled up to the house.  That was perfect timing since it was still snowing fairly heavily.  If they had arrived l...

Countertops Cut and Glued

Image
I had a busy day today cutting up lumber to make our butcher block countertops for the outdoor kitchen.  It was like a typical Monday today though. First, I couldn't get the table saw adjusted correctly.  Then, when I finally got the saw adjusted well enough, I had problems with the lumber.  As I ripped the lumber it was binding the saw and then bending into crazy shapes after it was ripped to rough size.  I then needed another two passes in the saw to get them to manageable pieces of lumber.   Then, I whacked my head again...   then again...  at that point, I went inside to retrieve my bump hat.  I think I whacked my head another ten times while wearing the bump hat!  It was one of those days.  (I have a headache again this evening.) I managed to get the countertops assembled, cut to size and they are now set in place on top of the cabinets.  For now, they are simply clamped down to the cabinets.   ...

Outdoor Kitchen Coming Along

Image
After a trip to Lowes the other night for more building supplies, I started my day yesterday by moving all the lumber we bought from my car to dry areas I have setup in our yard.  Then I got started on pulling power tools out of the shed and collecting all the other tools I would need for the day.   Once everything was organized and setup, I began cutting and assembling the back of the base cabinets and end panels on the base cabinets for our outdoor kitchen.  This actually went fairly quickly but all the bending and twisting was brutal on my spinal injuries.  This is the view as you are coming up the stone path to our back door... Here you can see how the cabinets form a "U".  I still need to cut and assemble the face frames for the left and the back side of the "U".  The wood you see in the photo is actually the back panel.  Since there is no countertop in place yet (I haven't even begun to cut and assemble the butcher block countertop ...

Ridge Cap and Electrical

Image
Yesterday, Sheila helped me install the ridge cap on the play house and outdoor grill kitchen.  Once we had the roof all sealed up, we then tackled some electrical including installing the lighting.  It looks pretty good! Even though we made some noticeable progress yesterday, it was slow going.  First, I needed to remember how to join the ridge cap for intersecting ridges.  Then, I had to cut, then bend, then flash, then install.  This first piece of ridge cap was bent in a way so it could be folded over the adjoining perpendicular ridge.  I also added some flashing that was cut and bent to shape.   Installing was slow going because it was difficult to reach the area where the two ridges meet.  I had to lay across some boards on the roof while Sheila held the step ladder in place.  Plus it was hot up on that metal roof and the sun was blindingly bright reflecting off the new shiny roof! The second piece of ridge cap was al...

Temporary Supports Removed

Image
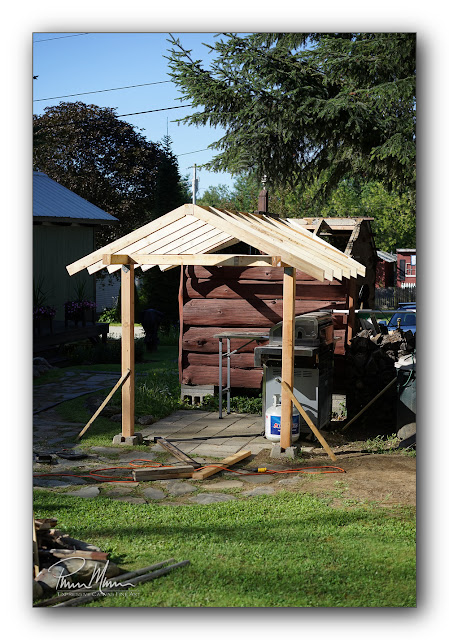
The sky cleared up today and we haven't had any rain falling from the sky so I headed outside to see if I could accomplish something with one of the larger projects on my To-Do list.  I had previously cut all the supports necessary for the outdoor kitchen roof structure so I decided it was time to install those supports so I could remove the temporary supports. So, now I have clear headroom when I walk into this little kitchen area.  ( As a sidenote...  I wore my new ball-cap hard hat today...  good thing because I slammed my head about eight times today while I was installing the collar beams.  My mild-TBI headache is back but I'm certain that it would have been far worse if I wasn't wearing the new hard hat.) Every support that I added today was both glued and bolted.  I bolted everything with 3/8" galvanized bolts.  This support, below, forms a nice stiff triangle of support keeping the column upright... This is the same type of support ...

Outdoor Kitchen Project

Image
The other day, I finally started on our outdoor kitchen/grill project.  I already had all the lumber on hand that is seen in these photos...  two 4x4 posts and a bunch of 2x4's...  and it was long past time to get started on this project.   Actually...  since this structure ties in with the playhouse roof, the playhouse is getting a nice upgrade rebuild and renovation so this is really a two part project. Our dryer broke so that is now slowing me down a bit but I have made a significant amount of headway on this project....  hmmm...  headway...   that reminds me...  I also whacked my head twice during this project already! On our previous big project, I also whacked my head hard enough to see stars, gray-out and buckle me at the knees.  That resulted in about a month of nothingness as my mild traumatic brain injury healed a bit.   I had a couple of temporary supports holding things in place on that project....

Garden Window Update

Image
I've moved on to the second phase (and unplanned phase) of our garden window project by working on refinishing the window sashes for this window.  Our homebuilt garden window has a couple of removable window sashes that we can insert into the frame for colder weather. In the warmer months, I will leave the sashes out (as seen in the photo to the right) so the view is wide open with no obstructions. These sashes were in pretty lousy shape. It seemed silly to design and build this nice new garden window and then just install the same old worn-out sashes when the weather cools down and during the longer part of the year when we need extra insulation. I've been experiencing this throughout our renovations... you know... when you make a clean spot, everything else that didn't look so badly before you made a clean spot suddenly appears horrendous... I needed to do something about these window sashes.  I also needed to replace the window sill... something else I hadn'...

Garden Window Mostly Finished

Image
This week, I've been working on building a garden window that I designed. There were a few setbacks but the window is now closed in and in a finished state, finally! We had some lousy weather... first far too hot and humid which is particularly catastrophic for my health and that did affect my health. The sun and heat actually caused what appeared to be hives (according to Sheila) but it didn't feel like hives... regardless, my skin did not look pleasant. One day this week was so humid that I couldn't breath so I went back indoors and laid in the air conditioned house for the remainder of the day. Then we had intermittent rain causing some more delays.  Near the end of the project, I needed to use my drill press. I don't use this benchtop tool often so I had to dig it out of the shed and dust it off. Well, I needed to do more than just dust it off... it was seized up completely.   Clamping down the straight edge for cutting glass. I opened the lid to the dr...

A New Sink and Faucet

Image
New sink and faucet installed in our old cabinets. Our renovation plans include a garden window in place of the window in this photo. We're planning to completely gut and renovate the kitchen as soon as we have time and some cooperative health (for both of us!) . In the meantime, we're storing away new building supplies for this project.  We've had a new kitchen sink and faucet sitting here for a few months while the old sink and faucet continued to drive us crazy everyday. The old sink was too small... the faucet was a poor quality one with very little clearance between the sink and the spout... the sink was dented and old... and the sprayer hasn't worked correctly in years. This stuff needed to be replaced years ago. Since the sink and faucet were just sitting there on the floor, I decided to do something about it the other day. I've replaced sinks and faucets in the past and, typically , this is a quick and easy project requiring no more than one to two ...