Posts

Showing posts with the label explore scientific

New Telescope Mount is Incredible
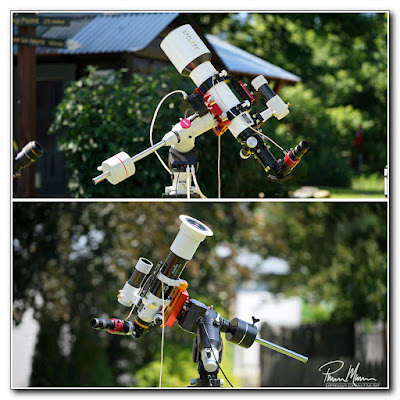
Image
Old mount on top, new mount at bottom. I already wrote about my problems with my old primary telescope mount so I won't get into the specific issues I have been experiencing with that old mount here in this blog entry.  A couple of days ago, I was able to take the new mount out for a spin out under the sky for a bit of visual solar astronomy and I was very pleased.  This new mount is simply incredible by comparison and is a tremendous upgrade from the old mount!  It worked exactly as it should from start to finish.  There were no unpleasant surprises nor any frustrations with the mount itself whatsoever.   Whenever I used my old mount, my focus seemed to be more on the mount and its quirkiness rather than the object I was trying to view or image.  These quirky traits could easily be justified as truly being faults and poorly written code.  The term quirkiness is just a bit kinder and gentler.  Really though, that old mount has always had ma...

Autopsy of Old Telescope Mount

Image
I n order to convert my old GoTo telescope mount into a fully manual mount, I had to disassemble all the parts that made this mount a GoTo tracking mount.  This allowed me to more closely inspect these parts.  Mostly, this close inspection was simply out of curiosity but I also wanted to know what part(s) failed so I can help others who have this mount and encounter similar problems.   Disassembling the motor housings was the first problem (pictured at right).  It seemed that the screws holding the clamshell motor housings together were stripped.  I could not get a screwdriver to fit well enough so I could make any headway in removing these eight screws. Note:   I've since decided that the screw heads were not actually stripped.  I believe they were either screwed in too tightly or some sort of glue like Loctite was used to keep these screws firmly in place.  Instead, I decided to just remove the housings as a whole.  Once I had the...

Homemade Pier Extension Completed

Image
I finished my homemade telescope pier extension project today and it seems to be working as planned. There isn't a whole lot in life that is more satisfying than designing something in sketches in a notebook, then building each individual part yourself, then assembling all the parts and finding that everything works just as designed and planned! My primary problem that prompted this project was that my longer telescopes would hit the tripod legs when viewing almost straight upward.  Also a factor in my decision is that my astronomy tripod isn't tall enough for my longer refractor telescopes which meant I would need to sit down very low on the ground to see into the eyepiece.  I needed a pier extension to raise the mount and telescope higher.   Some may ask why I don't just extend the legs fully to gain some overall height but this is a bad idea for two reasons.  First, it will do nothing for me to resolve the telescope colliding with the tripod legs.  And ...

Some Solar Astronomy

Image
My health is still recovering from the problems I had Saturday but I felt like dragging a telescope out to the front deck to observe the sun this morning. It doesn't require a whole lot of energy to peer through a telescope but I do need to be careful out in the sun or I'll end up with failing health again. I definitely don't have the energy nor is my head clear enough to attempt any home improvement/repair projects so I will probably bounce between the piano and the telescope all morning. It is a bit hazy again today so the viewing isn't great but it is better than the clouds and rain we've had for the past week or longer. At least the sun is shining! Up until today, all my astrophotography has been done using my Sony a6000 with its 1.5x crop sensor. This morning, however, I decided to give my full frame Sony a7 a shot... My Sony a7 worked just fine. This camera will give me a slightly wider view but also should provide smoother gradients and simply bette...

Solar Astrophotography

Image
The sun can be seen illuminating the back end of the Wedge. It has been difficult for me to get out at night lately to view the night sky with a telescope. We don't get crisp, clear nights all that often and especially in the summer. My health problems don't help in this cause either because quite often I am left too exhausted by the time we finish dinner. The real icing on the cake lately has been a roaming bear in our neighborhood at night and I really have no desire to bump into a roaming bear in the dark! Needless to say, it has been difficult to get out at night for some astronomy in recent weeks. The aforementioned nighttime viewing problems got me wondering about giving daytime solar astronomy a try. To make a long story short, I found that all I need to do to view the sun is replace one part of my telescope with a part that is designed specifically for viewing the sun... then add a filter or two... then I can view the sun with my own telescope and shoot images w...

The New Telescope

Image
Sony a6000 camera So, after writing about my "first light" experience last night, I realized that I haven't really written anything about this telescope or even the camera I used. Let me start by saying that both of these pieces of equipment are considered "entry-level"... the telescope is an entry-level telescope for just getting started in astrophotography... and the camera is an entry-level, all purpose mirrorless interchangeable lens camera.  Let's start with the camera since that is what actually captures the imaging. It is a Sony a6000 camera body... quite small and almost pocketable... but works great for action photos of the grandchildren as well as wildlife photography. This is also the camera I bring to the hospital because its shutter is quieter than my better camera and because it is a bit smaller than my better camera. This is an old camera by digital standards but it far surpasses entry level cameras produced today by all other manufact...