Posts

Showing posts from June 23, 2024

Charging Jack

Image
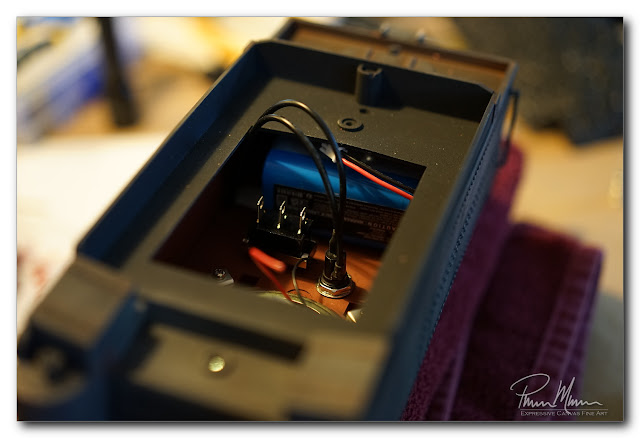
T he first thing I did this morning was to install the charging jack into the tender.  The glue holding the mounting plate in place had dried overnight so it was secure enough to drill the hole and install the jack.  That was a quick and easy job this morning! This charging jack is located underneath the water hatch of the tender which allows me easy access to recharging the battery which will power the locomotive.  The jack has a rubber seal to keep water out of it in case I get caught by a surprise rain shower.  Actually, I'm a bit surprised that the rubber seal fits in this very small space.  It fits so I'm leaving it in place.   I still have not soldered any wires nor installed the DCC circuit board but the tender is now ready to be wired.  

Locomotive Electronics

Image
I 'm not feeling the greatest today so I opted to move to a different area of this locomotive project.  I'm not feeling well enough to be making decisions on weathering so I decided that was out pretty early this morning.  Anything requiring a judgement call is out of the question today so that eliminated any further weathering today.  This meant it was time to start working on something that has a pretty firm plan like getting the tender ready for all the electronics. Fortunately, there is plenty of room inside this tender for everything I will be adding to it.  This will make this conversion to battery power quite easy. First, I installed the big speaker for the sound.  Then I installed the fuse-holder and the On-Off-On switch.  Then I placed the battery inside the tender too to ensure I still have plenty of room for the DCC circuit board.  This circuit board is shockingly small so I know I have plenty of room it is just a matter of where I will position it inside this tender

Started Weathering

Image
M y large scale steam locomotive kitbash is still coming along.  This project is taking far longer than I anticipated but at least it is coming along nicely. Yesterday, I started the day by adding trim to the cab and then I spent the rest of the morning and into the afternoon continuing the weathering that I had previously started on the backhead of the cab.  This time, I was weathering the outside of locomotive and tender rather than just inside the cab.   I'm finding that getting the weathering just right is a delicate balance of differing subtle colors...  ie, rust, white discolored corrosion, and simple weathering of varying shades.  I find that I do a bit of weathering in one color and then I need to add other subtle colors to tone down what I had previously done.   Before I started weathering yesterday, I finished all I plan to do with the cab on this project.  The ceiling is done...  the cab is painted...  I installed trim on the windows...  details added...  cab details pai