Posts

Showing posts with the label grill

Pulled Pork on the Grill

Image
W e had pulled pork for dinner last night and it was pretty good.  I made my own maple cole slaw and some hand-cut fries to go with it.  It was a really nice meal but it was an all day affair making it! One thing is certain... Having an outdoor kitchen under a roof makes something like this far easier and more pleasant to accomplish.   I did something a bit differently this time around.  Usually we take the quick and easy route by slow cooking the pork in the oven for about four hours.  That always turns out well but this time I went with a much slower cook on the grill.  I did it on the grill this time around for two reasons.  First, any meat tastes better on the grill.  And two, if I used the grill, then I could actually smoke the pork for even more flavor.   I applied my homemade dry rub on Friday and let the pork sit in the fridge overnight.  Then I started the grill at around 9:45am with a combination of Cherry wood chips ...
Apple Cider Donut Morning

Image
The kids and Nan and Pop decided to stop by Sunday morning to bring us some cider donuts for breakfast.  I warmed up the grill while Sheila pulled out the cinnamon sugar so we'd be ready when they arrived.   We warmed up the donuts on the grill and they were delicious!  We had some apple cider as well.   Since the skies were clear in the morning, I set up one of my solar telescopes so we could view the sun.  There were no sunspots so the sun was a featureless disk but it was nice to peer through the scope anyway... As always, Lukey and Kenzie took turns shooting with two of my cameras and they did a pretty good job.  This particular day was a bit more difficult for them though since the sun was high and bright.  They managed to get a few keepers though... I'm not sure when this was but, apparently, mommy took a short nap... Donuts for breakfast led to some hot dogs on the grill for lunch.  Sometime ...

Countertops Cut and Glued

Image
I had a busy day today cutting up lumber to make our butcher block countertops for the outdoor kitchen.  It was like a typical Monday today though. First, I couldn't get the table saw adjusted correctly.  Then, when I finally got the saw adjusted well enough, I had problems with the lumber.  As I ripped the lumber it was binding the saw and then bending into crazy shapes after it was ripped to rough size.  I then needed another two passes in the saw to get them to manageable pieces of lumber.   Then, I whacked my head again...   then again...  at that point, I went inside to retrieve my bump hat.  I think I whacked my head another ten times while wearing the bump hat!  It was one of those days.  (I have a headache again this evening.) I managed to get the countertops assembled, cut to size and they are now set in place on top of the cabinets.  For now, they are simply clamped down to the cabinets.   ...

Outdoor Kitchen Coming Along

Image
After a trip to Lowes the other night for more building supplies, I started my day yesterday by moving all the lumber we bought from my car to dry areas I have setup in our yard.  Then I got started on pulling power tools out of the shed and collecting all the other tools I would need for the day.   Once everything was organized and setup, I began cutting and assembling the back of the base cabinets and end panels on the base cabinets for our outdoor kitchen.  This actually went fairly quickly but all the bending and twisting was brutal on my spinal injuries.  This is the view as you are coming up the stone path to our back door... Here you can see how the cabinets form a "U".  I still need to cut and assemble the face frames for the left and the back side of the "U".  The wood you see in the photo is actually the back panel.  Since there is no countertop in place yet (I haven't even begun to cut and assemble the butcher block countertop ...

Ridge Cap and Electrical

Image
Yesterday, Sheila helped me install the ridge cap on the play house and outdoor grill kitchen.  Once we had the roof all sealed up, we then tackled some electrical including installing the lighting.  It looks pretty good! Even though we made some noticeable progress yesterday, it was slow going.  First, I needed to remember how to join the ridge cap for intersecting ridges.  Then, I had to cut, then bend, then flash, then install.  This first piece of ridge cap was bent in a way so it could be folded over the adjoining perpendicular ridge.  I also added some flashing that was cut and bent to shape.   Installing was slow going because it was difficult to reach the area where the two ridges meet.  I had to lay across some boards on the roof while Sheila held the step ladder in place.  Plus it was hot up on that metal roof and the sun was blindingly bright reflecting off the new shiny roof! The second piece of ridge cap was al...

Temporary Supports Removed

Image
The sky cleared up today and we haven't had any rain falling from the sky so I headed outside to see if I could accomplish something with one of the larger projects on my To-Do list.  I had previously cut all the supports necessary for the outdoor kitchen roof structure so I decided it was time to install those supports so I could remove the temporary supports. So, now I have clear headroom when I walk into this little kitchen area.  ( As a sidenote...  I wore my new ball-cap hard hat today...  good thing because I slammed my head about eight times today while I was installing the collar beams.  My mild-TBI headache is back but I'm certain that it would have been far worse if I wasn't wearing the new hard hat.) Every support that I added today was both glued and bolted.  I bolted everything with 3/8" galvanized bolts.  This support, below, forms a nice stiff triangle of support keeping the column upright... This is the same type of support ...

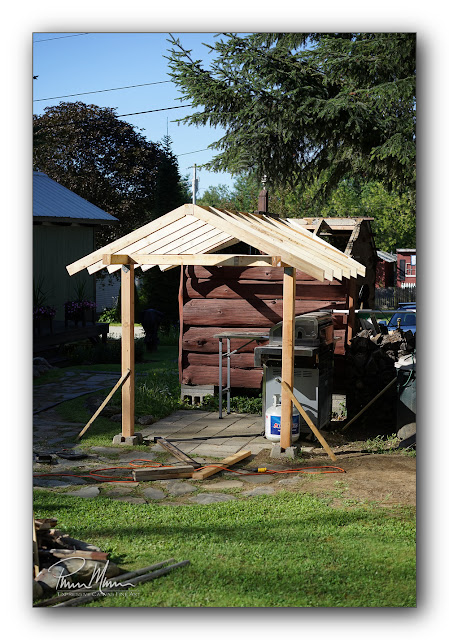
Outdoor Kitchen Project

Image
The other day, I finally started on our outdoor kitchen/grill project.  I already had all the lumber on hand that is seen in these photos...  two 4x4 posts and a bunch of 2x4's...  and it was long past time to get started on this project.   Actually...  since this structure ties in with the playhouse roof, the playhouse is getting a nice upgrade rebuild and renovation so this is really a two part project. Our dryer broke so that is now slowing me down a bit but I have made a significant amount of headway on this project....  hmmm...  headway...   that reminds me...  I also whacked my head twice during this project already! On our previous big project, I also whacked my head hard enough to see stars, gray-out and buckle me at the knees.  That resulted in about a month of nothingness as my mild traumatic brain injury healed a bit.   I had a couple of temporary supports holding things in place on that project....