Posts

Daytime Lunar Photo

Image
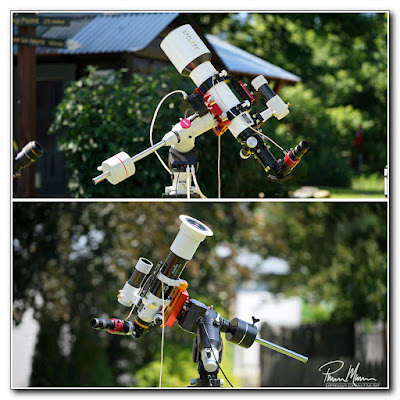
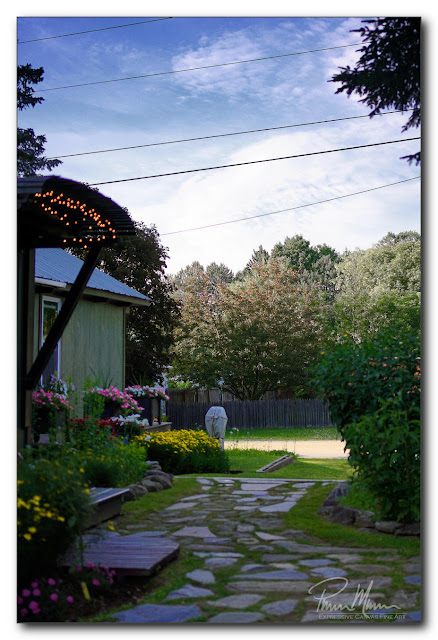
After I finished converting my old EXOS2-GoTo tracking mount into a fully manual mount, I went outside to check on the gardens around the house.  I noticed that the moon was in the sky!  I don't remember the last time I saw the moon in the sky and I know I haven't observed the moon through any of my telescopes since last fall.  I decided to head back inside to grab one of my grab-and-go telescopes...  a small telescope on a lightweight tripod.   This particular telescope is a Skywatcher 72mm ED refractor.  It is small and lightweight but has excellent optics.  I often use this same telescope for solar astronomy.  One of these nights, if we ever have a clear night when I am feeling well enough, I hope to do some nighttime imaging with it too.   When I stepped outside with the telescope, the first thing I noticed was a bird up high in a nearby tree so I pointed the telescope at this bird....  it was a dove and the view of this bird was surprisingly crisp.  I was actually hoping t

Old Mount is Now Fully Manual

Image
M y slow motion control knobs arrived this morning.  I quickly pulled the gears off each axis of my old mount and installed these new knobs in place of the gears.  I had been, very briefly, using the old gears as slow motion control knobs until these new knobs arrived.  These new knobs make it very easy to slowly track astronomical objects manually as the objects slowly drift across the sky.  Well...  really, the Earth is rotating and the astronomical objects are stationary by comparison but they appear to drift across the sky in an arcing pattern.   The upper photo shows the Declination axis while the lower photo shows the Right Ascension axis.  These knobs are just the right size for easy fingertip control of slow tracking.   Here, below, is a photo of the Declination axis gear that I removed this morning.  The gear shaft is a standard 1/4" shaft so finding nice knobs to the replace the gears was very easy.  For a short while, I thought about just using the gear as a slow motion

New Telescope Mount is Incredible

Image
Old mount on top, new mount at bottom. I already wrote about my problems with my old primary telescope mount so I won't get into the specific issues I have been experiencing with that old mount here in this blog entry.  A couple of days ago, I was able to take the new mount out for a spin out under the sky for a bit of visual solar astronomy and I was very pleased.  This new mount is simply incredible by comparison and is a tremendous upgrade from the old mount!  It worked exactly as it should from start to finish.  There were no unpleasant surprises nor any frustrations with the mount itself whatsoever.   Whenever I used my old mount, my focus seemed to be more on the mount and its quirkiness rather than the object I was trying to view or image.  These quirky traits could easily be justified as truly being faults and poorly written code.  The term quirkiness is just a bit kinder and gentler.  Really though, that old mount has always had many frustrating faults most of which I di

Autopsy of Old Telescope Mount

Image
I n order to convert my old GoTo telescope mount into a fully manual mount, I had to disassemble all the parts that made this mount a GoTo tracking mount.  This allowed me to more closely inspect these parts.  Mostly, this close inspection was simply out of curiosity but I also wanted to know what part(s) failed so I can help others who have this mount and encounter similar problems.   Disassembling the motor housings was the first problem (pictured at right).  It seemed that the screws holding the clamshell motor housings together were stripped.  I could not get a screwdriver to fit well enough so I could make any headway in removing these eight screws. Note:   I've since decided that the screw heads were not actually stripped.  I believe they were either screwed in too tightly or some sort of glue like Loctite was used to keep these screws firmly in place.  Instead, I decided to just remove the housings as a whole.  Once I had the housings off the mount with the motors and electr

Last Day of Imaging with Old Mount

Image
A s I mentioned in a previous blog entry, last Saturday was my last day of imaging with what was, at the time, my best telescope mount (see photo, at right).  At the time, it seemed like the electronics were toast so that put an end to this last imaging session within a short few minutes.  Then I spent the next few hours trying to figure out exactly what was wrong with this mount. Even after a few days, I still had not fixed the mount because I still had no idea what could be wrong other than perhaps a piece of obsolete and no-longer-available electronics failed so I ordered a new mount.  The mount I ordered was the newer and significantly improved version of this older mount.  The advantage of purchasing the same (but improved) mount is that I wouldn't need to purchase any other associated accessories because this new mount would fit everything I already own.  It would fit every tripod, it would fit my telescope pier with no adapting necessary, and all my associated accessories wo

Some Landscaping Photos

Image
One evening, while Gee went to pick up Lukey and Kenzie earlier in the week, I wandered around our yard with one of my cameras in hand.  Most of our flowers are now in bloom so it was time to try to capture some nice images of the landscaping around our house.   We get a lot of compliments about our home as people walk by our house.  Actually, almost everyday we get at least one compliment.  Even while I was shooting photos on this particular evening, a neighbor walked by and told me she loved the house and that "it looks like a little paradise".  I must be doing something right with our landscaping and the exterior of the house. Here are a few photos. First, here is a photo looking toward the road... Here is our covered outdoor kitchen...  one of the most useful and nicest additions to our home... We used to cover this tree in Christmas lights every year until it grew to about 30 feet tall.  Now it is probably more than 50 feet tall... Another evening of S'mores... Two o

Solar Imaging This Time

Image
I had previously written about a morning of solar observing .  This time, I am going to write about a morning of solar imaging . I was excited to do some imaging because my previous morning of observing-only was exceptional.  The atmospheric conditions (astronomical "seeing" as it is rather unscientifically and rather ridiculously called by the astronomy community) were well above average when I was observing the previous day.  Those kinds of seeing conditions are rare so I was hoping that this morning of imaging would have skies that were just as good.  Sometimes good seeing lasts only an hour, other times it will last for a couple of days.  It was clear on this morning, there was a deep blue sky, and the weather was beautiful.  Above average seeing conditions would be awesome for imaging.   After about a half hour of setup time, running in and out of the house collecting the necessary gear and assembling it all, I was ready to fire up the computer and point the telescope to

A Morning of Solar Observing

Image
I've been overwhelmingly exhausted this past week so I really haven't been doing much other than sleeping, eating and using the bathroom.  This morning, however, we had an unusually clear, sunny sky so I decided to do some solar observing with a couple of telescopes.  I felt that I had enough energy in me to drag a couple of telescopes out of the house for a simple observing session so that is what I did.   I had quickly decided to just make this an observing session only though.  To do a "proper" imaging session would require far more equipment including a computer and associated cables and thus would require far more energy.  This was energy I still didn't have just yet.  Honestly, I was still feeling as though I could sleep for another week before diving into anything too taxing.  My plan was to just observe the sun for about an hour or so while saving enough energy to then put everything back in storage.  (It turns out that I did not have enough energy to prop

Model Railroad Crossing Grades

Image
L ukey's train set is being improved little by little.  That was the intention when I first built this HO scale train set for him.  Every now and then, we would add something else to it.  About a week ago, we added railroad grade crossing signs. These buckboard crossing sign posts came as a laser-cut kit so there was a lot of work to be done to make them look like grade crossings! We cut out each part, filed and sanded the edges smooth, glued each piece, and painted them in appropriate colors.   We added these newly built buckboard grade crossing signs to the layout even though the actual road grades now need some adapting and attention.  We now have some buckboard crossing signs without a road in a couple of places.  Plus, even where there is a road, the road grade does not meet the track smoothly.  Finishing up these road grades at the crossing will be a project for another day.  Today's project was to assemble, paint and install the buckboard crossing signs... It may be diff