Solar Imaging This Time
I had previously written about a morning of solar observing. This time, I am going to write about a morning of solar imaging.
I was excited to do some imaging because my previous morning of observing-only was exceptional. The atmospheric conditions (astronomical "seeing" as it is rather unscientifically and rather ridiculously called by the astronomy community) were well above average when I was observing the previous day. Those kinds of seeing conditions are rare so I was hoping that this morning of imaging would have skies that were just as good. Sometimes good seeing lasts only an hour, other times it will last for a couple of days. It was clear on this morning, there was a deep blue sky, and the weather was beautiful. Above average seeing conditions would be awesome for imaging.
After about a half hour of setup time, running in and out of the house collecting the necessary gear and assembling it all, I was ready to fire up the computer and point the telescope toward the sun. My mount whirred as it moved my telescope to point toward the sun. Unfortunately, the moment I saw the sun on my computer screen, I knew the seeing was absolutely abysmal.
When the seeing is good, the skies are steady. A steady atmosphere means the sun will be in sharp focus, it will stay in sharp focus and it will actually remain steady with no warping wobble as I observe or image it.
When the seeing is bad, the skies are very unsteady. This means that, on this particular morning, the sun was bouncing up and down on my computer screen. The sun was wavering so much that focusing was near impossible. As the sun was distorting in and out, side to side and up and down like a big clump of wobbling Jello. The crispness of the sun was varying as well. Well, "crispness" isn't really the right word in this case. There was nothing at all crisp about this sun. It was wavering Jello mush. What a disappointment.
I decided to continue on with my imaging plans regardless of the conditions since I don't get nearly enough time to delve into astronomy.
I was using my Explore Scientific ED 102mm APO refractor telescope and my Quark Hydrogen Alpha solar filter. My first views were "ehhh" but I still wanted to try some imaging.
With this particular telescope using this Quark solar filter, I would not see the whole disk of the sun. I would only get closeups of the sun. More magnification and poor seeing is a bad combination. That being said, I was still hoping to get lucky. Maybe I would capture enough decent frames of images that I could produce some acceptable final images.
First, I'll insert three images in monochrome. The best cameras to use for solar imaging are monochrome cameras. The sun is only viewed in one color at a time and, which color, depends on the type of filter you are using and what solar features you want to see. All types of solar filters are narrowband filters, some more narrow than others, which allow only one color through to your camera. At each color wavelength, we will see different things in different layers of the sun. In this case, I was using a hydrogen alpha filter so we were imaging in the red band at an extremely narrow 656nm wavelength.
When observing the sun with this filter, the sun will appear a deep but bright red. A color sensor is composed of red sensors, green sensors and blue sensors. The red sensors only record shades of red. The green sensors only shades of green and the blue sensors, only shades of blue. If I use a color camera to capture this narrow red light then the blue and green sensors will be wasted and just make the image a bit fuzzy. Color sensors simply do not work well for imaging a single color in a narrowband wavelength.
Instead, you image using a monochrome sensor in a camera that only records shades of light (not color) at all of the sensor's pixels. A monochrome sensor does not see specific red, green and blue pixels like a color sensor will do. All the pixels on the sensor (actually called sensels) of a monochrome camera will record shades of light which is what we want. Hence, we are left with monochrome images...

The photo below, is another closeup of a different area of the sun. Here we have a rather giant filament among the flame-like spicules...


I spent another few hours troubleshooting the mount and then decided that it might be time to replace the mount with a new, better mount (which was already on my 'wish list'). This seemed like an electronic failure of some sort and parts are no longer available for this older mount. Now I am awaiting the arrival of better mount.
_________________________________________________________________
Post Edit: I'm no longer sure that this new mount will actually arrive. The retail store where I purchased it is now showing it is out of stock. I find it hard to believe that I purchased the last one when I'm pretty sure they only received stock a couple of days ago. Even if they received a single pallet of these mounts, I find it hard to believe they would sell out within days. However, if they only received three mounts in their shipment, then perhaps it makes sense that they are out of stock again. I'm not too confident that I'm getting this mount from this retailer though. If I don't receive a shipping notification by late in the day tomorrow (the 48 hour point since I ordered the mount) then I will have to contact them to find out about the status of my order. If my order is now a backorder, I will definitely be cancelling the order. We'll see...
Post Edit - July 13, 2022: I received an email around lunchtime today stating that my new mount has shipped and should be arriving tomorrow. That is good news!
__________________________________________________________________
My plan is to convert the broken old mount to a manual mount with slow motion knobs. The slow motion knobs will allow me to manually track objects as the Earth rotates and objects seemingly rotate around Polaris (the North Star). Maybe while taking it apart to convert it I'll spot the problem. If it is reparable, I'll probably repair it otherwise it will be converted to a manual mount. Hmmm... I could really use a heavy duty manual mount with slow motion control knobs though... I should probably just convert it rather than fix it.
I have an excellent smaller mount I can use but I can only use that smaller mount with smaller telescopes so that significantly limits me. At least I can stay busy with something on hand if the weather is good enough for astronomy while I am waiting for the new mount to arrive.
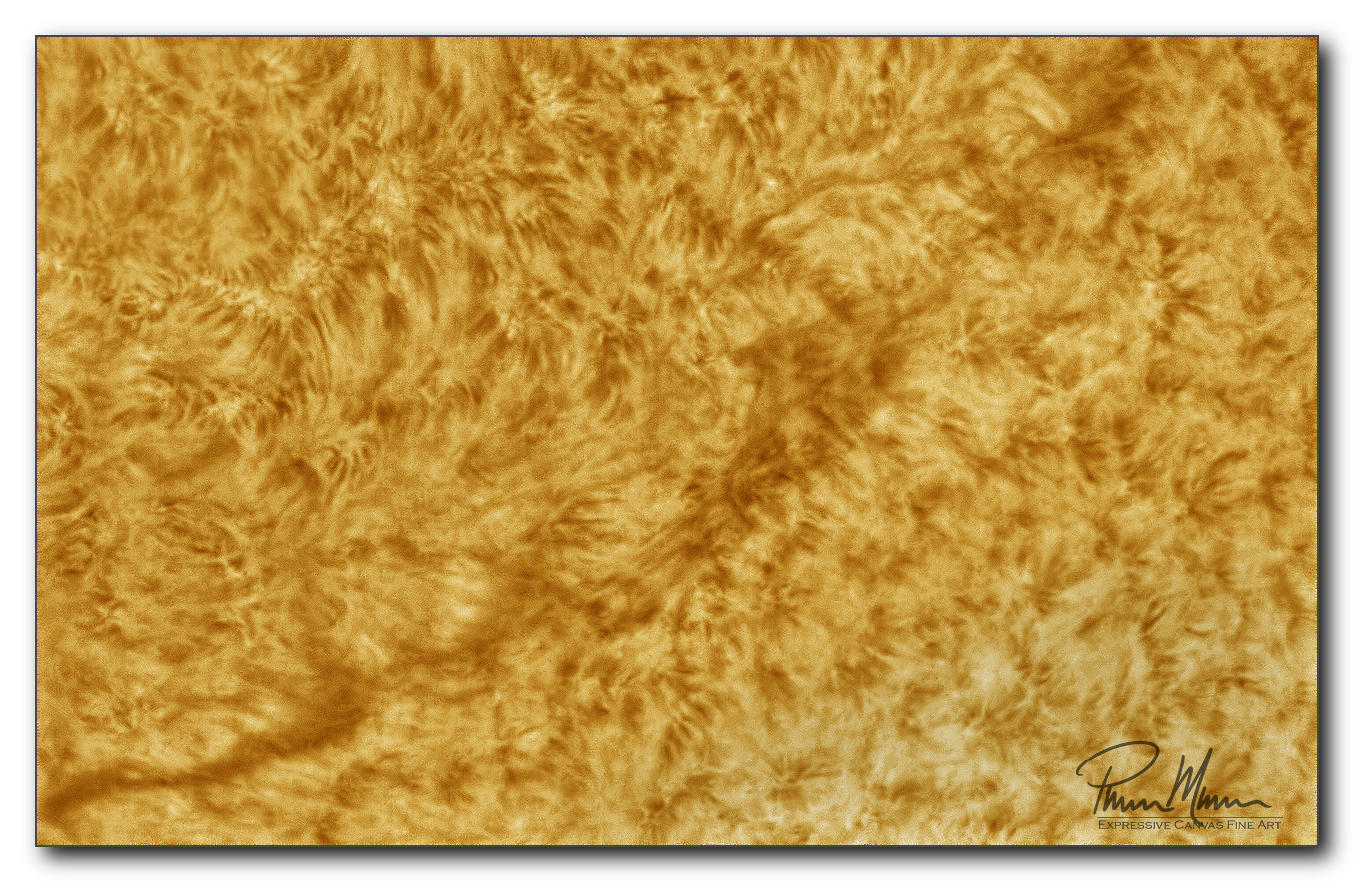
I'll close this blog entry with these same three images but with versions that I processed with false color. Most people prefer to see the sun in an orange color so many astronomers choose to process their Ha solar images in an orange color.


_____________________________________________________________
Post Edit - July 13, 2022: Since post-processing Ha solar images is relatively new to me, I really need to refine my own workflow. I'm not all that happy with the results posted in this blog entry. I know that the atmospheric conditions gave me mush for images but I'm still having difficulty post-processing these Ha solar images consistently and accurately. I actually edited a couple of these images again this evening and produced slightly better results. Accurately reproducing better results for every image will be even more difficult. I'm making progress though.
_____________________________________________________________
Before I close this blog entry I should also point out that imaging allows the astronomer to refine the observable details in post-processing. This is mostly done by stacking hundreds of good images in an effort to obtain some sort of superresolution images. Stacking images makes the very faint details stand out more while also cutting down on grainy noise. This process works very well in good seeing (atmospheric conditions) but I had difficulty with this on this day because I could only get up to about 3-5% of my images good enough to stack. The rest of the images were mush and would only make the final image mushier.
These details, to some extent, can still be seen when observing but they are fainter, less pronounced, and less detailed. Imaging in good seeing is the way to go but you need the Earth's atmosphere to cooperate! It did not cooperate on this day, unfortunately.
Oh yeah... nor did my mount cooperate on this day!
Comments
Post a Comment