Posts

Showing posts with the label homemade

Another Homemade Solar Filter

Image
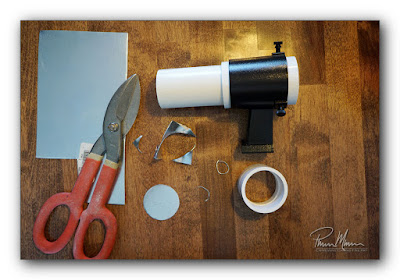
Back a year or so ago, I built a wood frame solar filter for one of my larger telescopes and, if interested, you can  read about it here.   This is another blog entry about a new homemade solar filter that I made about a month ago to be used, mostly, for testing purposes but it never hurts to have multiple ways to view the sky, daytime or nighttime.   I decided to build this solar filter for two reasons.... 1) I already had the supplies so it wouldn't cost me anything, and, 2) I want to compare one of my Spectrum glass solar filters to this new solar film filter I made as well as compare it to my solar wedge as a comparison between the three types of solar filters.   To make this comparison as accurate as possible and to keep as many scientific controls as possible in this little test, I decided that I should use the same telescope and the same camera so the only significant variable in this test would be the filter itself.  My small Skywatcher ED 72mm refractor was the best option

Homemade Lights for the Playhouse

Image
I knew I wanted something different for the lighting in the playhouse.  I quickly decided to create my own lighting out of leftover cans from large cans of tomatoes.   At first I thought about creating something with a sailing theme but my artwork consistently moved too far into complicated territory and I wanted these lights to be simpler.  I especially didn't want the building of these light fixtures to be any more difficult than necessary because I was on a tight schedule at this point to get the whole playhouse project finished. I decided to create star patterns...  one recognizable group of stars for each light.  I chose The Big Dipper, The Little Dipper and Cepheus mostly because these star patterns would be easily recognizable and fairly easy to drill into these old cans.   I set my drill press on the outdoor kitchen countertop so I could work on this project during a rainy day then I went back to work on some of my many outdoor projects including renovating th

Solar Finder Scope Finished

Image
This is one of those projects that I started many months ago but was put on the back burner while waiting for better weather.  Back in March, I designed and built a solar finder scope but I had not painted it.  I needed to wait until I could use some spray paint outdoors which means I needed warm weather and dry weather.  In between other little projects, I managed to get this solar finder scope completed.   Although the sun is very bright in our sky, it actually is difficult to get a telescope lined up with it for viewing through a telescope!  The sun is so bright that you can't look directly at it so you then just guess where to point the telescope.  You move the telescope up...  then right...  then left...  then down...  then up again...  hoping to get it in your view.  Alternately, you can try to minimize the telescope's shadow on the ground but that can also be a little frustrating.  Instead of playing this little game of cat and mouse, I designed a solar finder scope to

Telescope Pier Success

Image
I'm going to keep this short and sweet because I am feeling so lousy.  The past few days have been generally lousy as far as my health goes.  I still managed to get a few little things accomplished over the past few days.   What I accomplished should have been accomplished in a few hours but it required a few days for me to get this done considering how I was (am) feeling.  Anyway, the telescope pier project is now a success! Here is a photo of the telescope pier doing its thing around lunchtime today... This morning, I assembled the mount leveling adapter which is the white metal part on top of the wooden pier...   And, a closer look at this newest part... In this photo, you can clearly see the polar alignment pin.  This turned out to be an easy part to create contrary to what I expected.  I did, however, need to file down one side of the top of this pin in order to make it fit into my telescope mount.  The four bolts around the outside of this adapter make it v

Working with Metal Again

Image
I got a little more accomplished on the metal telescope pier adapter.  Today, I drilled holes for 1/2 inch stainless steel bolts (running thread, actually) which will be used to enable fine leveling of the mount.   At this point, I'm running out of oil for keeping the drill bits cool while drilling.  I only have about five more holes to drill...  and two of those holes will require tapping...  maybe I do need some more oil.  We'll see...  The drilling went well.  I was left with two pairs of four holes perfectly aligned with each other.  I will have 1/2" stainless steel threaded rod in these holes.  The running thread will separate the two halves of the adapter...  top and bottom...  about four inches apart...  and stainless steel nuts will allow me to level this adapter.   Here is the top of the telescope pier...  this metal adapter will bolt directly to this wooden top plate through the four holes around the circle scribed into the wood.  The two diagonal l

Telescope Pier Seeded

Image
As expected after all the heavy work yesterday, today has mostly been a day of recovery.  I slept most of the day so far but I did manage to get a little bit of clean-up accomplished around the telescope pier. I was able to backfill around the pier.  There was only about a foot to backfill here because the rest was filled with quick setting concrete.  After leveling it off, I put down some grass seed.  Someday down the road (certainly not this year), I may add stone or concrete pavers to this area.  For now, it will be grass. Those four little stakes in the ground along the timber step (seen in the photo below) are where I will be putting in 4x4 fence posts.  I'll have a gate in between the second and third posts and then the fence will turn back toward the house at the end posts.   The grass seed is green in these photos...  the areas that appear to be just plain dirt on each side of this telescope pier area are wildflower gardens that we planted yesterday.   I desig

It Works!

Image
I had to head back outdoors to lug the drill press back to the shed so I decided to test my new homemade solar finderscope while I was out there anyway.  I quickly assembled it in the kitchen...  I grabbed my camera...  and then I headed out to the sunlight... It works! Well, that is a relief!  It is always nice when something you design works as designed.  Now I can mount this finderscope on my little telescope when I use it for solar observing and imaging. When we get back home from our long cross-country journey, I'll do the finish painting on the outside of the finderscope.  Now I feel like I accomplished something!  

Getting Sidetracked

Image
I was supposed to start sorting clothes, do some laundry, and do some ironing  this morning for our upcoming cross-country trip.  I was planning to get started on ironing and went searching for an over-the-door hanger so I had a place to hang the shirts I ironed...  I couldn't find it...  I got frustrated...  then I got sidetracked. During my search for the over-the-door hanger, my spinal injuries started hurting and I was getting worn out.  While searching, I noticed a piece of sheet metal in the back room and that was all it took for me to change gears and work on a different project.  So, instead of preparing for this trip, I pulled out that piece of sheet metal...  then dug out some tools... and I started working on a solar finder scope that I designed yesterday.  Yesterday, I had already made a crude form of a solar finder scope out of a short piece of PVC pipe and one coupler.  I cut each to various sizes so I could accurately piece everything together in a workable form

Garden Window Update

Image
I've moved on to the second phase (and unplanned phase) of our garden window project by working on refinishing the window sashes for this window.  Our homebuilt garden window has a couple of removable window sashes that we can insert into the frame for colder weather. In the warmer months, I will leave the sashes out (as seen in the photo to the right) so the view is wide open with no obstructions. These sashes were in pretty lousy shape. It seemed silly to design and build this nice new garden window and then just install the same old worn-out sashes when the weather cools down and during the longer part of the year when we need extra insulation. I've been experiencing this throughout our renovations... you know... when you make a clean spot, everything else that didn't look so badly before you made a clean spot suddenly appears horrendous... I needed to do something about these window sashes.  I also needed to replace the window sill... something else I hadn'

Garden Window Mostly Finished

Image
This week, I've been working on building a garden window that I designed. There were a few setbacks but the window is now closed in and in a finished state, finally! We had some lousy weather... first far too hot and humid which is particularly catastrophic for my health and that did affect my health. The sun and heat actually caused what appeared to be hives (according to Sheila) but it didn't feel like hives... regardless, my skin did not look pleasant. One day this week was so humid that I couldn't breath so I went back indoors and laid in the air conditioned house for the remainder of the day. Then we had intermittent rain causing some more delays.  Near the end of the project, I needed to use my drill press. I don't use this benchtop tool often so I had to dig it out of the shed and dust it off. Well, I needed to do more than just dust it off... it was seized up completely.   Clamping down the straight edge for cutting glass. I opened the lid to the dr

Small Project Between Rain Showers

Image
I've been a little bit busy this week with a new project... finally!  I've been putting off a bunch of projects lately due to ongoing rainy, hot and humid weather, poor health, and medical appointments for both Sheila and me, but mostly due to the absolutely abysmal weather we've had this summer. I needed to get going on at least one project before the snow flies! I decided to start on a to-do list of about 20 items (most of which I'll never get to this summer) with building and installing a garden window over our kitchen sink. We've been talking about buying a garden window for quite some time but the prices are absurd so I opted to design and build my own. That's my answer and resolution for most things, actually... but this garden window is something new to me.  At this point, I have most of the wood cut and painted with at least one coat of white paint. I still need to cut some wood to length for the frames of the glass panes for the sides of the wi

Today's Food Prep

Image
Thankfully, I think I am done with another day of Thanksgiving food prep! Sweet Italian sausage for my Country Harvest Turkey Dressing. Earlier this afternoon, I cooked up some sweet Italian sausage for my Country Harvest Turkey Dressing. This sausage will get chopped up with some onions, sage, corn bread, seasoned bread, garlic, thyme, and dried cranberries... then add some chicken stock... into the oven for a bit... this should be some pretty tasty dressing! So, the sausage is now cooked, moved to the fridge and ready to be chopped tomorrow.  While the sausage was cooking, I had four sweet potatoes in the oven. These sweet potatoes will be for my Bourbon Glazed Yams. After cutting the sweet potatoes, I'll add some butter, maple syrup, molasses, brown sugar, cinnamon, cloves, nutmeg, and some bourbon. Throw this concoction in the oven and then finish the last few minutes with some mini marshmallows on top until they are browned.  So, the sweet potatoes are ready to go

Dollhouse Update - Finished!

Image
The dollhouse is finished and ready for Christmas morning! As I've mentioned in previous blog posts about this dollhouse, I designed this dollhouse to be a Georgetown-style townhouse with a brick sidewalk and small patio. I wanted to build a townhouse-style dollhouse so that the dollhouse could sprawl vertically, rather than horizontally, saving precious floor space in our small home. This was the right idea for our small home. I'm quite happy with the design but actually wish I had more time to add more details. If I were to add more details today, I would add curtains, lighting, pictures to hang on walls, window boxes with flowers, and more kitchen details.  As it is, however, it is definitely ready for Christmas morning and an excited grandchild. I'm sure Kenzie will be glued to this dollhouse the moment she sees it! Kenzie will also be receiving a doll family to use with this 1:12 scale dollhouse... a mom, a dad, a young girl, and a baby...