Posts

Showing posts with the label townhouse

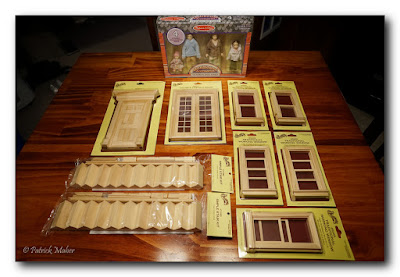
Some Dollhouse Details

Image
As it rains, sleets and snows outside, we have remained indoors all day. Some of the details for the dollhouse have arrived so I spent some time working on these details. I have two staircases to install but, first, I need to paint each of the staircases as well as all the balusters and railings. Today, while watching a couple of movies, I managed to put a coat of paint on all of this stuff. While I was painting all these tiny pieces, I was trying to figure out the best way to assemble all of this (and shaking my head, wondering why I got myself into all of this...)... the only thing I figured out is that this will be a frustratingly tedious task! I guess if I just take it one piece at a time, it will eventually get done. EDIT:  Sheila and I were just talking about these staircases. There is about a 95% chance that either Kenzie or Lukey will break the railing and balusters within a matter of hours so... I am now thinking that I'll eliminate the railings on the sides of

Progress on the Doll Townhouse

Image
(As I've written before when writing about this Christmas project, since Kenzie is still young enough to make it impossible for her to read this blog entry, there really is no problem in writing and publishing blog entries about her Christmas present so here is an update.) The front facade... before trim... before brick sidewalk... Despite my relatively poor health lately (and for the past three months), I've squeezed in some time here and there during the halfway decent periods to make some progress on the dollhouse Christmas project! It is still unassembled to make it easier to work on different areas of the house. At some point, however, I'll need to assemble this townhouse... glue, screws and nails... and then just finish it with tiny brushes and a lot of patience. For the purpose of this photo, I carefully placed the pieces together and then tied it together with a cord (seen across the top in the first photo). The windows and doors are just placed into thei

Some Progress on Dollhouse

Image
Everything laid out flat as I visually placed the doors and windows for appealing spacing.   The weather was beautiful the other day so I was able to pull some tools out of the shed to do some woodworking out on our front deck. I am trying to avoid doing any woodworking indoors because of all the sawdust it spreads. The project I chose to work on was the dollhouse. I had some 1/2" cabinet grade plywood available in our shed so I decided to use this for the dollhouse. Now that I've cut and notched everything to its basic shape, in hindsight, I could have used some thinner plywood. The doors I bought for this dollhouse were made for thinner walls so now I'll need to add some scale jamb extensions to the two doors. On the positive side, the five windows are made for 1/2" walls so I'm good to go with those. This townhouse dollhouse is beginning to take shape! I'm looking forward to getting it assembled. Clamped together for a dry fit... all the pieces

Building a Townhouse

Image
I am getting ready to start building a Georgetown-style townhouse (sans window shutters) that I designed... a dollhouse townhouse, that is! I don't think little Miss Mackenzie is able to read just yet so I am probably safe writing about one of my Christmas projects for this year.  Not long ago, I asked Kenzie if she would like a nice dollhouse to play with whenever she visits and her eyes lit up, a big smile came to her face like the Grinch thinking about a nasty thought, and she scrunched down with her little hands on her thighs like she was going to suddenly spring up and jump for joy. I suddenly realized that I had just inadvertently committed myself to building a nice dollhouse for Christmas! Fortunately, I already had an idea formed in my mind. I started sketching and kept things very simple which is difficult for me. My projects always seem to evolve into more detailed projects with many fine details. My sketches have remained quite simple though which is good news fo