Numbering My Fleet
Back a couple of years ago, I happened to win an O scale (the old Lionel size) diesel locomotive on eBay for about $25. It runs on traditional 2 rails rather than 3 rails and can even run well on the tight curves necessary in a relatively small room (I have no room for large sweeping curves). I wanted to find a few more of these EMD F9 locomotives.
About a week ago, someone advertised three of these locomotives up for auction on eBay. Finally!
Long story short... I won the first one... was quickly outbidded for the second one... and then won the third one! The two diesels I won are still in the hands of the US Post Office but I'm already putting together a plan for this small fleet of locomotives.
First, I needed to come up with a numbering scheme. There is a big "853" on the side of each of these diesels. Repainting is too much work so I decided to just add a suffix to each number... 853A, 853B, and 853C. This morning, I set out to create backlit numberboards for each of these locomotives with their new numbers. (I need to think about this numbering scheme some more, I think, since the digital power controller will be looking for a numeric number not alpha-numeric.)
(Post edit: I've thought about this numbering problem some more throughout the remainder of the day and I decided it would be wiser to number the three locomotives as 8531, 8532 and 8533 to avoid any potential issues with my power controller naming protocol.)
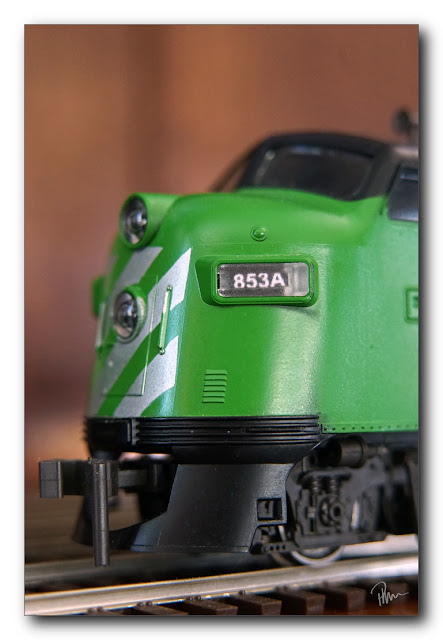 As seen in this photo, my first numberboard came out fairly well using my laserjet printer. I still need to adjust the size slightly and then print out two of each number since there are two numberboards on each locomotive... one on each side of the dual headlights. This first one is slightly crooked too but that is easy to fix.
After lying in bed and thinking about it all night long, I want to replace the lone incandescent bulb in this locomotive with constant LED lighting. I'll have two LED's for the headlights (one for each)... add an LED for each numberboard... and then also add a backup light on the rear of the locomotive. This will get a little complicated because I'll need to also make a fitted shield for each bulb to minimize stray light scattering inside the body shell but I do have a plan in my head.
I want to add more detail to these models too... first up will be more realistic couplers (front and back)... a more complete set of grab irons rather than the flat molded plastic ones on this molded body shell... then will come some windshield wipers (the windshields look naked to me the way they are now)... maybe a bell on the roof... and, at some point, I'd love for at least one of these models to have a full interior cab.
I plan to convert these DC analog diesels to digital DCC command control by rewiring each locomotive and adding some electronic circuitry. This will provide very realistic sound, lighting control and much better operation overall but will require some wiring and electronics work. Considering how large these locomotives are, this should be a fairly easy upgrade. There is plenty of room under this big body shell for adding components even with declining eyesight and not-so-steady hands (which is why I am moving back to larger scale models).
Of course, if I want sound, then I will need to add a speaker as well. Right now, I'm thinking of putting in a more realistic looking dynamic braking fan on the roof and using that as a speaker grill to allow sound to find its way out of the body shell. This should work very well but I'll need to find just the right dynamic braking fan.
This is going to be a fun project. I'm looking forward to upgrading and detailing this small fleet of mine...
About a week ago, someone advertised three of these locomotives up for auction on eBay. Finally!
Long story short... I won the first one... was quickly outbidded for the second one... and then won the third one! The two diesels I won are still in the hands of the US Post Office but I'm already putting together a plan for this small fleet of locomotives.
First, I needed to come up with a numbering scheme. There is a big "853" on the side of each of these diesels. Repainting is too much work so I decided to just add a suffix to each number... 853A, 853B, and 853C. This morning, I set out to create backlit numberboards for each of these locomotives with their new numbers. (I need to think about this numbering scheme some more, I think, since the digital power controller will be looking for a numeric number not alpha-numeric.)
(Post edit: I've thought about this numbering problem some more throughout the remainder of the day and I decided it would be wiser to number the three locomotives as 8531, 8532 and 8533 to avoid any potential issues with my power controller naming protocol.)

After lying in bed and thinking about it all night long, I want to replace the lone incandescent bulb in this locomotive with constant LED lighting. I'll have two LED's for the headlights (one for each)... add an LED for each numberboard... and then also add a backup light on the rear of the locomotive. This will get a little complicated because I'll need to also make a fitted shield for each bulb to minimize stray light scattering inside the body shell but I do have a plan in my head.
I want to add more detail to these models too... first up will be more realistic couplers (front and back)... a more complete set of grab irons rather than the flat molded plastic ones on this molded body shell... then will come some windshield wipers (the windshields look naked to me the way they are now)... maybe a bell on the roof... and, at some point, I'd love for at least one of these models to have a full interior cab.
I plan to convert these DC analog diesels to digital DCC command control by rewiring each locomotive and adding some electronic circuitry. This will provide very realistic sound, lighting control and much better operation overall but will require some wiring and electronics work. Considering how large these locomotives are, this should be a fairly easy upgrade. There is plenty of room under this big body shell for adding components even with declining eyesight and not-so-steady hands (which is why I am moving back to larger scale models).
Of course, if I want sound, then I will need to add a speaker as well. Right now, I'm thinking of putting in a more realistic looking dynamic braking fan on the roof and using that as a speaker grill to allow sound to find its way out of the body shell. This should work very well but I'll need to find just the right dynamic braking fan.
This is going to be a fun project. I'm looking forward to upgrading and detailing this small fleet of mine...
Comments
Post a Comment