Woodworking to Metal Work
I started off my day yesterday doing some woodworking. I had previously designed a microscope case and had assembled most of it already a few days ago. I needed to add a door and some handles yesterday.
Unfortunately, I'm a bit out of practice with my woodworking skills so I found cutting and assembling this wood was rough and a bit frustrating due to making some really stupid mistakes which cost me some good lumber. In the end, the case is looking good assembled though.
I still need to add some medium density foam to three areas on the inside of this case to keep the microscope from touching hard wood surfaces. I'm happy with the design of this case though.

I still need to add hardwood plugs to cover the screw holes and then stain and finish the outside of the case. The interior will remain unfinished.

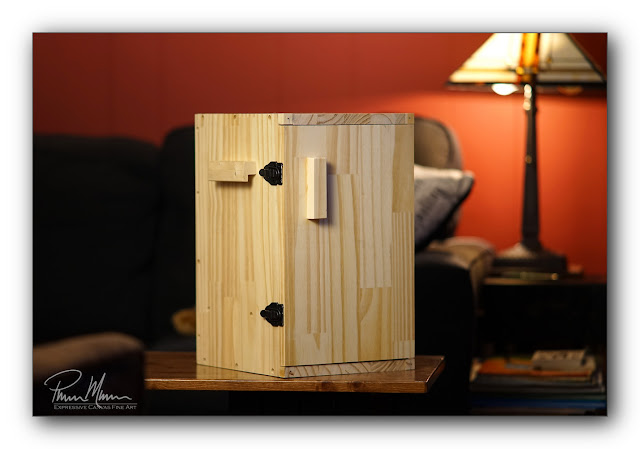
One area where I had some difficulty in the design of this case was how to fasten the door closed. I opted for two of these basic buckle fasteners. I just needed to ensure the door was designed so I could use this type of fastener.

Another area where I had some hard decisions to make on the design was the front door handle. I could not find any handles that I liked so I made one out of a piece of scrap wood.

Carrying handles were another issue. I could not find any handles that I liked so I opted to design my own handles to match the front door handle. This worked out great!

When the weather is halfway decent outside, I'll take this case outdoors to do one last sanding and then stain it and finish the exterior. I'm liking this case though!
This morning, I changed up my skills and switched to metal work. For some reason, although I still made some mistakes due to being out of practice, this metal work was less frustrating than the woodworking. I suppose it is because I expect higher standards from myself when doing woodworking since I have a lot more experience with woodworking.
I'm in the process of building two telescope mounts that I designed in recent months. Whenever we were at the hospital sitting in waiting rooms, I was sketching ideas for inexpensive telescope mounts. I came up with a few ideas and now I am attempting to build these two types of mounts.
In the interest of saving some money, I've needed to fabricate some of my own parts. This morning, I was fabricating four locking pipe collars. I need these collars to hold my counterweights in place on each of the counterweight shafts. I had a few different options here but I opted for an old weightlifting type of collar with a locking thumbscrew.
A few days ago, I purchased a small section of 1" black pipe. This morning, I went at that pipe with a hacksaw and cut four small collars out of it. Some oil made these cuts a little easier. Then I used my belt sander to clean up the edges.

I marked where I needed to tap a hole on each of these four collars. I then used a cold chisel to dimple the black pipe. I made a crude jig to hold the collars while I was drilling. I added some oil... and drilling was a piece of cake.

After drilling the holes, I used a 1/4-20 tap to add threads to each of the holes.

In this photo, below, you can see one of these collars holding a counterweight in place. This homemade mount needs to be painted white but the counterweight shaft will remain chrome. I'll also paint these collars I just made white to match the mount. This particular mount is an equatorial mount.

This photo shows more of this equatorial mount. I plan to tap more threaded holes in that "tee" pipe so I can add clamping knobs which will provide some friction or lock-down to hold the mount in place as necessary.

I also designed an altitude-azimuth mount. This particular configuration can hold two telescopes... one on each end of the top of the "T". This double telescope configuration will not require any counterweights.

I can unscrew one of the arms of the top "T" to use this altitude-azimuth mount with just a single telescope. In the single telescope configuration, I would then screw a chrome counterweight shaft into one side of the "tee" so I can mount counterweights as necessary. The heavier the telescope, the more counterweights required. Again, two of the collars I fabricated this morning would hold the counterweight(s) in place providing the necessary balance.

I plan to paint these two mounts white. The clutch locking knobs will be black so they stand out against the white mount and the counterweight bars will remain chrome. Of course, I'll need to add saddles to each of the mounts so I can clamp any of my telescopes onto the mount. I still need to purchase these saddles. I'm holding off on that purchase because this will probably be the most expensive part for these homemade telescope mounts. Common sense is telling me not to skimp here and manufactured telescope parts are pricey. In the end, I'm sure I will give in and purchase the best saddles for the job. As I said, I already have a particular model saddle in mind.
So, I've had a few productive mornings recently. Then I attempt to sleep in the afternoons to keep my health from crashing. I'm still "not right" since my failed attempt at a colonoscopy back in September so I'm thinking that I am now at a new normal for me. That problem really screwed up my health. Anyway, even on relatively good days, sleeping in the afternoon is necessary to keep my health as stable as possible.
I have a long To-Do list so I hope to continue knocking off little tasks one by one.
Unfortunately, I'm a bit out of practice with my woodworking skills so I found cutting and assembling this wood was rough and a bit frustrating due to making some really stupid mistakes which cost me some good lumber. In the end, the case is looking good assembled though.

I still need to add some medium density foam to three areas on the inside of this case to keep the microscope from touching hard wood surfaces. I'm happy with the design of this case though.

I still need to add hardwood plugs to cover the screw holes and then stain and finish the outside of the case. The interior will remain unfinished.

One area where I had some difficulty in the design of this case was how to fasten the door closed. I opted for two of these basic buckle fasteners. I just needed to ensure the door was designed so I could use this type of fastener.

Another area where I had some hard decisions to make on the design was the front door handle. I could not find any handles that I liked so I made one out of a piece of scrap wood.

Carrying handles were another issue. I could not find any handles that I liked so I opted to design my own handles to match the front door handle. This worked out great!

When the weather is halfway decent outside, I'll take this case outdoors to do one last sanding and then stain it and finish the exterior. I'm liking this case though!
This morning, I changed up my skills and switched to metal work. For some reason, although I still made some mistakes due to being out of practice, this metal work was less frustrating than the woodworking. I suppose it is because I expect higher standards from myself when doing woodworking since I have a lot more experience with woodworking.
I'm in the process of building two telescope mounts that I designed in recent months. Whenever we were at the hospital sitting in waiting rooms, I was sketching ideas for inexpensive telescope mounts. I came up with a few ideas and now I am attempting to build these two types of mounts.
In the interest of saving some money, I've needed to fabricate some of my own parts. This morning, I was fabricating four locking pipe collars. I need these collars to hold my counterweights in place on each of the counterweight shafts. I had a few different options here but I opted for an old weightlifting type of collar with a locking thumbscrew.
A few days ago, I purchased a small section of 1" black pipe. This morning, I went at that pipe with a hacksaw and cut four small collars out of it. Some oil made these cuts a little easier. Then I used my belt sander to clean up the edges.

I marked where I needed to tap a hole on each of these four collars. I then used a cold chisel to dimple the black pipe. I made a crude jig to hold the collars while I was drilling. I added some oil... and drilling was a piece of cake.

After drilling the holes, I used a 1/4-20 tap to add threads to each of the holes.

In this photo, below, you can see one of these collars holding a counterweight in place. This homemade mount needs to be painted white but the counterweight shaft will remain chrome. I'll also paint these collars I just made white to match the mount. This particular mount is an equatorial mount.

This photo shows more of this equatorial mount. I plan to tap more threaded holes in that "tee" pipe so I can add clamping knobs which will provide some friction or lock-down to hold the mount in place as necessary.

I also designed an altitude-azimuth mount. This particular configuration can hold two telescopes... one on each end of the top of the "T". This double telescope configuration will not require any counterweights.

I can unscrew one of the arms of the top "T" to use this altitude-azimuth mount with just a single telescope. In the single telescope configuration, I would then screw a chrome counterweight shaft into one side of the "tee" so I can mount counterweights as necessary. The heavier the telescope, the more counterweights required. Again, two of the collars I fabricated this morning would hold the counterweight(s) in place providing the necessary balance.

I plan to paint these two mounts white. The clutch locking knobs will be black so they stand out against the white mount and the counterweight bars will remain chrome. Of course, I'll need to add saddles to each of the mounts so I can clamp any of my telescopes onto the mount. I still need to purchase these saddles. I'm holding off on that purchase because this will probably be the most expensive part for these homemade telescope mounts. Common sense is telling me not to skimp here and manufactured telescope parts are pricey. In the end, I'm sure I will give in and purchase the best saddles for the job. As I said, I already have a particular model saddle in mind.
So, I've had a few productive mornings recently. Then I attempt to sleep in the afternoons to keep my health from crashing. I'm still "not right" since my failed attempt at a colonoscopy back in September so I'm thinking that I am now at a new normal for me. That problem really screwed up my health. Anyway, even on relatively good days, sleeping in the afternoon is necessary to keep my health as stable as possible.
I have a long To-Do list so I hope to continue knocking off little tasks one by one.
Comments
Post a Comment