White Light Solar Imaging
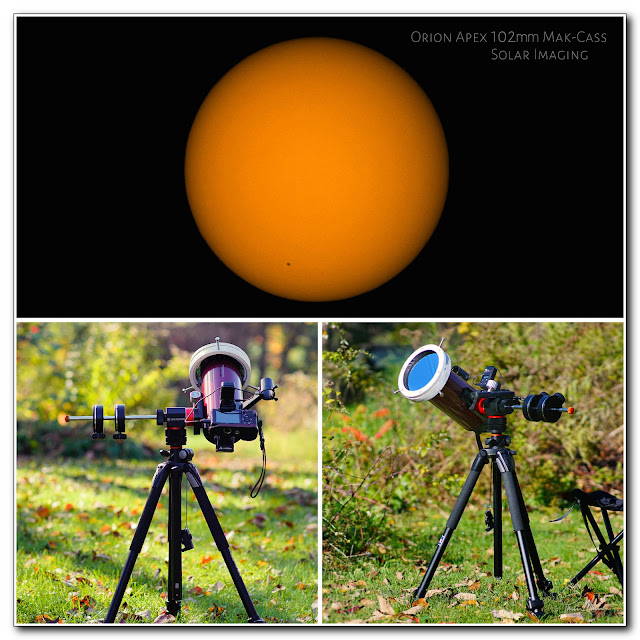
I had previously written about solar imaging in Calcium K (CaK). In that imaging session, I had used one of my usual nice little refractor telescopes (Skywatcher ED 72mm refractor). This time I am revisiting an imaging session done in white light when I used a really lousy little Maksutov-Cassegrain telescope. This telescope is the Orion Apex 102mm Maksutov-Cassegrain (uggg... I really hate a lot of characteristics of all reflector telescopes and this tiny little guy is no exception).
Seriously, I do not like this little telescope at all. I was told that a Mak-Cass would be "razor-sharp" yet this Mak-Cass does not provide a crisp image when compared to any of my refractor telescopes... not even when compared to my sub-$100 70mm achromatic telescope. It occasionally needs to be tediously collimated so that the mirrors are perfectly aligned otherwise the views are even significantly worse. Collimating a Mak-Cass is tedious and difficult. It requires a temperature acclimation period of at least an hour whenever I want to view the sky. It lacks contrast and clarity compared to my refractor telescopes. It seems that no matter what I want to do with this little telescope, there is always some sort of frustration that must be sorted out beforehand... or multiple frustrations. By comparison, my refractor telescopes are a joy to use, always, and I can just grab one of my refractors and go with it at a moment's notice without any frustrations whatsoever. The good points about this tiny little telescope is that it is small, compact and low cost. That is pretty much where the good points end though in my opinion.
I had shot a few sample images and sample videos while Sheila and I were testing this telescope one evening back in November. I wasn't even using an astronomy camera that particular night. I simply inserted my little Sony a6000 into the telescope's diagonal in place of an eyepiece and shot away using a wireless remote. I imaged this way because it was fast, easy and didn't require a computer nor external power.
The videos were shot in Full HD which is only 1920x1080 pixels instead of the imaging format of 6000x4000 pixels so the resulting images are quite small but "okay" for internet use. I won't be printing any big prints from these files. Regardless, at the time, I threw together a short video of our very short session that night which can be viewed here. This short video is pretty nice.
Since I was never really happy with the imaging results from those first few short sessions back in October and November when I first received this little telescope, I revisited those images and videos to see if I can squeeze out some better details using the stacking software I had mentioned in my previous blog entry. I was becoming more comfortable using this software so it was a good time to practice what I learned by using some older videos and images.
This stacking software breaks down the videos into individual frames. It then treats each frame as a separate image and stacks only the best images. The result, hopefully, is a decent final image.
This time around, my post-processing editing of this video conversion into images turned out better than my previous attempts and this is likely due to having a better understanding of how to effectively use this software. Of course, since this blog entry is about imaging the sun, this particular solar imaging session was earlier in the day on that same previously mentioned November evening. I'll share the resulting images from that evening of imaging in my next blog entry. This entry is about the sun.
I installed my homemade Baader film solar filter over the front end of the little telescope making it safe to view the sun and then captured some videos and images. I should note also that not only do I not care for this particular telescope, but I am no fan whatsoever of Baader solar film either. I think Baader Planetarium manufactures top end products but this solar film is not one of them. I'm not going to get into any details here but I have mentioned my disdain for solar film on numerous occasions in the past right here in this blog and I thought it was worth mentioning again so nobody thinks I recommend it. I may do a more in-depth critique at a later date though (or I might not bother because I don't find the product worth any more of my time and effort). Anyway, I used this homemade Baader solar film filter because it was the only one of my solar filters that is appropriate for this type of telescope and it is the only filter I own that actually fits this telescope. You use what you have on hand and make the best of it so that is why I used this filter for this session.
Anyway, this cool autumn morning, I captured the sun in white light. You can clearly see one prominent sunspot as well as tiny granules all throughout the sphere. These tiny granules, called granulation, are convection cells of plasma bubbling to the photosphere surface. Each granule is just under 1000 miles in diameter (the same physical size as a chunk of our planet from here in Vermont to St Louis) and lasts only eight to twenty minutes before it morphs into another bubbling granule mass. The sun's photosphere is a slowly bubbling mass of plasma. The resulting image shown below truthfully isn't anything spectacular but it is a nice image. I've certainly seen far, far worse!
After saying that I've certainly seen far, far worse images by others, maybe I should explain a bit about what I typically see in solar imaging from others. Far too often these other people seem to always want to significantly over-sharpen their image which results in overpowering halos around all edges. (I see this same poor sharpening technique on far too many lunar images as well.) Quite often the images are over-exposed which washes out detail. Quite often I see images where the astronomer missed focus so the image is rather soft and lacking detail. And, I often see funky attempts at coloring these white light images. Personally, I'm not sure I'll continue with this orange tint for my white light imaging since I am now going to be adding hydrogen alpha images too and hydrogen alpha is also orange. I may skew the color of my future white light images more toward a duller yellowish-tan tint so we can more easily differentiate between my white light images and hydrogen alpha images. The key is to choose a tint that is appealing without masking detail, makes sense and to stick with it so all your solar images of the same wavelength match. The most common problem that ruins white light solar images is grossly over-sharpening the image and I truly wish people would stop doing that (the same with lunar images).
In my next blog entry, I will share the results from later that evening when Sheila and I did a short session looking at solar system objects in the night sky.
Comments
Post a Comment