Sanding, Sanding, and More Sanding
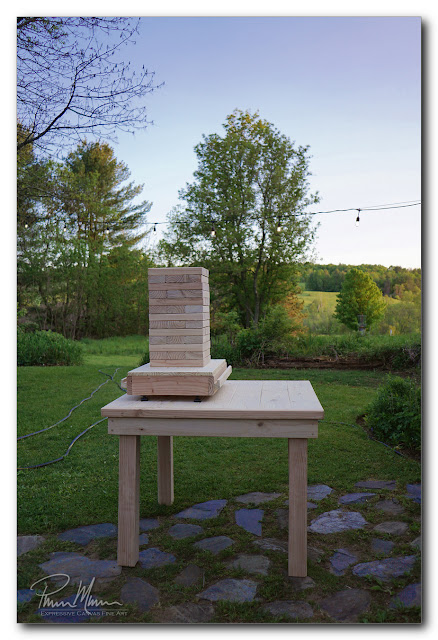
Everything in the photo, at right, has been sanded with 80 grit sandpaper followed by 120 grit sandpaper so I am making some progress.
As seen in the photo at right, I made a table for the backyard and I am making a Giant Jenga game. Each of these small projects has required a lot of cutting and even more sanding.
Giant Jenga will be played on the ground. It is only sitting on the table for the photo, at right. Actually, I wanted to keep the bare wood off the damp lawn so I placed everything on the new table. All this wood in this photo still needs sanding with 220 grit sandpaper but that finish sanding with 220 grit should go quickly.
This photo only shows about two-thirds of the Giant Jenga pieces because I still need to sand the remaining third of pieces. I ran out of energy yesterday and I ran out of 80 grit sanding belts anyway.
I started these two projects by starting on the Giant Jenga game first. I cut up a bunch of 2x4's to make the 54 Giant Jenga pieces and then made a leveling base. The leveling base is dual purpose. As the name implies, this base allows me to level the base on the uneven lawn. It can also be used to store all 54 of the stacking pieces neatly when turned upside-down. I put two easy-to-grab wood rails on each side of this base to make carrying the heavy load much easier too (for two people). Sheila and I already tried moving the whole game while stored in its base without the handles and it was a little difficult. These handles make a huge difference.
Since I made this game using typical framing 2x4's, they do require a lot of sanding to smooth the pieces. When the pieces are rough, it makes it very difficult to slide out the Jenga pieces without toppling over the stack right near the beginning of each game. Smooth pieces really are necessary but these pieces cut from framing 2x4's were too rough for this purpose without spending a lot of time sanding them smooth.
I started with an 80 grit on my belt sander. This knocked down all the roughness but I went through a lot of 80 grit sanding belts! Some of the pieces had some sap on them which gummed up the belts so they needed to be replaced much sooner than normal. Some of the belts tore apart while sanding so they needed to be replaced. Some of the belts just quickly wore down and needed to be replaced.
After smoothing out all the rough spots on all the pieces with the 80 grit sanding belts, I used a 120 grit on my orbital sander to smooth out the still mildly rough surface left by the coarse 80 grit. The next step is to use a 220 grit on the orbital sander to really smooth each piece nicely. I don't think I'll need to go finer than a 220 grit.
_____________________________________________________________
EDIT: I found that I should have used a 180 grit sandpaper in between the 120 grit and 220 grit. The 220 grit did not take out all the minor coarseness of the 120 grit. 180 grit would have resolved that problem but at the cost of a lot more time spent sanding.
_____________________________________________________________
After all the Giant Jenga pieces are sanded, I plan to use a fine finishing wax on each piece. This will make each piece smooth and a bit slippery which will make sliding the pieces out of the stack a bit easier.
Unfortunately, I ran out of 80 grit sanding belts for my belt sander when I was only about two-thirds of the way through the large pile of pieces. I have more sanding belts arriving in the mail tomorrow so I should have all the sanding done later in the week.
In the meantime, today, I hope to do the finish sanding on the table that I built. The purpose of this table is mostly for playing games in the yard but it can be and will be used for eating as well. I should be able to get all the finish sanding done on the table today and then it will be ready for stain.
The legs of the table are removeable so we can easily store it away safely out of the weather. It is a very sturdy table so I suppose my only complaint is that, in order to make it very sturdy, it quickly became a rather heavy table which isn't ideal for a table that is supposed to be portable. It is a nice looking solid table though!
Both projects are coming along nicely. There were some hiccups along the way that slowed things down a bit but each hiccup was quickly addressed and fixed. The table looks great and I'm looking forward to a few games of Dominoes on this table. The Giant Jenga game should be a lot of fun too when it is completed. So far, they're both looking great though.
These two small projects seem to be taking forever to complete though! I'm definitely looking forward to getting both of these small projects completed as soon as possible.


Comments
Post a Comment