Posts

Telescope Diagonals

Image
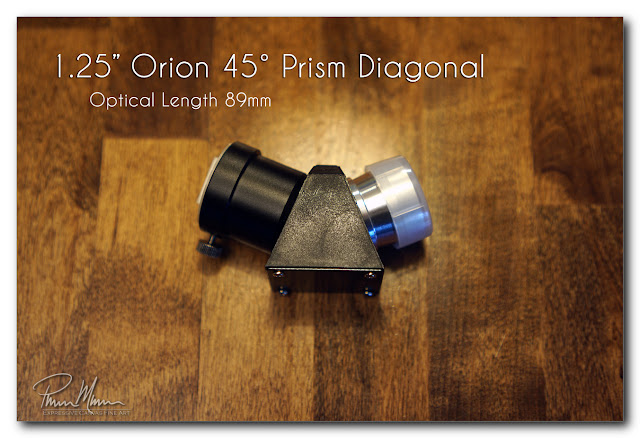
Whenever I'm observing the night sky (as opposed to imaging the night sky), I use a diagonal placed into my focuser.  The diagonal reflects the light that is streaming through the telescope to a 90° angle making it easier to view through the telescope.  Some diagonals are at 45° but those are mostly used for terrestrial observing where the telescope is mostly horizontal or level.  The eyepiece is placed into the diagonal and, due to the diagonal reflecting the light  90°, the top of the eyepiece  is now pointing upward making it easier to look down into the eyepiece.  This is the purpose of the diagonal...  to direct the light to the eyepiece at a position that is easier for viewing. If you had no diagonal to change the direction of the light, you would need to crane your neck to view straight through the telescope.  Sometimes you would even need to be sitting or lying on the ground to view the sky through the telescope if not using a diagonal....

Kenzie and Gee Run a 5K

Image
This past Saturday morning, Kenzie and Gee ran a 5K run together.  This was their second year running in this particular event and it was obvious that they enjoyed themselves again this year!  I enjoyed being there too! I had heard on the news that 1200 people ran in this year's Girls on the Run 5K event.  Just like last year, Kenzie and Gee were in the first of four groups for the staggered start.  They were near the front of the pack at the start as well as at the finish.   We arrived at the fairgrounds at 7:30 in the morning as the gates opened.  This allowed us to get a front row parking spot as well as allowed us to beat the traffic getting into the fairgrounds.  It also allowed Kenzie and Gee to get prepared and focused for their run.   As you can see in the photo, below, Kenzie was wound up and ready to go when we arrived...  she got some good air for this photo... Below, Kenzie's coach is pinning Kenzie's name and number ont...

Hot Pretzels and Beer Cheese Dip

Image
T he other night, Sheila and I had no energy to cook a full meal nor were we all that hungry for a typical dinner so we just made some hot buttered pretzels fresh out of the oven with a homemade beer cheese dip that I threw together.  That definitely hit the spot!   I took some notes on how I made the beer cheese dip and then, after eating the pretzels and the dip, I adjusted the recipe and ingredients so it will be even better next time.   We'll definitely be making this again!

Giant Jenga with the Grandkids

Image
Liza and the kids spent some time at the house after Kenzie's and Gee's 5K run the other day.  They had a little time to kill before Lukey's baseball game later in the afternoon.  While we killed time, we set up the newly finished homemade Giant Jenga game in the backyard so the kids could play a couple of quick games. The weather was chilly, windy and it looked like it would rain at any moment.  We could definitely use the rain but we didn't get any.  It actually feels like September and the lawn looks like a typical dry September lawn.  We really could use rain...  a lot of rain at this point.  We were able to squeeze in a couple of quick games before Liza and the kids had to run to Lukey's baseball game.   Lukey played against Gee in the first game.  Kenzie had the winner in the second game.  Unfortunately, Ace wouldn't allow Kenzie to play so the game was cut short when Ace knocked the tower of blocks over.   Gee and L...

Ready For Playing

Image
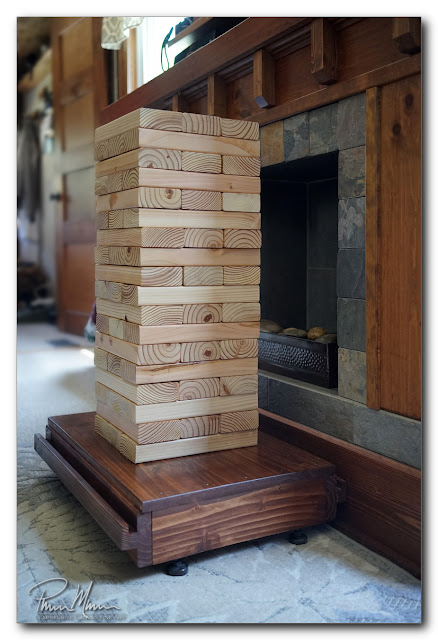
O ur homemade Giant Jenga game is now ready for playing in our backyard! After I finished sanding all the 2x4 pieces with 220 grit sandpaper (which was after 80 grit and 120 grit), I waxed every piece and then polished the wax until it was smooth and slick.  I also waxed the top of the leveling base.  Now every piece is very smooth and looks nothing like a typical framing 2x4 which is how this wood started!  Each of these pieces started very rough when I first cut the 2x4s to length.  Now they are looking nothing like a typical framing 2x4. For some reason, I thought that the relatively easy process of applying wax and then polishing it would go very quickly but, as usual as my health worsens and I get older, I was very wrong in my time estimate.   I think the waxing required even more of my time than sanding with the last grit of sandpaper did and that took far longer than I anticipated!   I found that I could only wax and polish 12 of the pieces...

Configuration for Full Disk Solar Observing

Image
I had written previously about finally finding a configuration of gear that makes full disk solar observing far more enjoyable than without this new configuration of solar gear.  The purpose of this blog entry is more about documenting this new and unusual configuration so I can duplicate it again each time I want to observe the full disk of the sun with my Quark solar filter.  Of course, I have this configuration documented in my notes too but I figured it would be good to document it here as well.   My larger telescopes provide more closeup views but I like to see the whole disk as well.  In order to improve my full disk view, I had to play around with a few ideas on how I could possibly accomplish this.  I kept going back to my assortment of astronomy components to assemble different configurations.  Then I had to play around with spacing.  It was a fairly long process of trial and error based upon the knowledge I had gained through experience...

Slipping Focuser

Image
W hen I was out testing a new solar astronomy gear configuration a few days ago, I had a problem with my focuser slipping.  This was caused by two factors...  first, this new configuration put a lot of weight on the focuser...  and second, at the time, I was viewing the sun at its highest point in the sky at noon.  This orientation made it easier for the focuser to slip downward toward the ground.   When I brought the gear back indoors, I tried to adjust some of the setscrews underneath the focuser but, honestly, I had no idea what any of the setscrews did.  You would think that you want all of them as tight as possible but that is completely wrong in this case.  I had to do some research. While in bed that night, I did some research on my Kindle.  I found a thread in an astronomy forum about adjusting this focuser.  I wanted to get out of bed right away to fix this focuser but I wisely memorized the page and then went to sleep instead....

Solar Observing with Two Eyes

Image
T he sky was clear this morning so I decided to do a little solar observing rather than woodworking.  I'd really like to get the two woodworking projects I am working on finished but I couldn't pass up the clear skies especially since I haven't really done any solar observing yet this year.   I had a couple of things related to solar observing that I wanted to try so it seemed like a good morning to do some experimenting with astronomy gear.  The weather should be nice for the next few days so I could easily put off the woodworking projects for a day so I could finally get to spend some time observing the sun. I had a lot of nice success with a larger telescope when using my new binoviewers while viewing the moon, Venus and Mars last night so I wanted to try solar observing with the same binoviewers for solar observing.  Viewing with two eyes provides far less eye strain than viewing with one eye and eye strain is something I have been experiencing lately. ...

Viewing with Two Eyes

Image
W hen I was doing some solar observing last week, I was having some problems keeping my single eye focused and open while also keeping my other eye closed.  After about five or ten minutes of observing with one eye, my eyes were twitching and they simply were not cooperating anymore.  I am definitely getting old!   These types of eye difficulties are often related to typical weakness due to old age but it is also partially related to my primary illness.  If I am beginning to have difficulty seeing through my telescopes as I did the other day, then that is a serious problem and I need to find a solution to this problem.   I felt the best solution was to get a binoviewer made specifically for telescopes so I could view the sky with both eyes instead of only one.  This is known to alleviate the typical eye strain from viewing with only one eye for longer periods of time. So, a couple of days ago, I ordered a binoviewer to be used on my telescopes an...

Sanding, Sanding, and More Sanding

Image
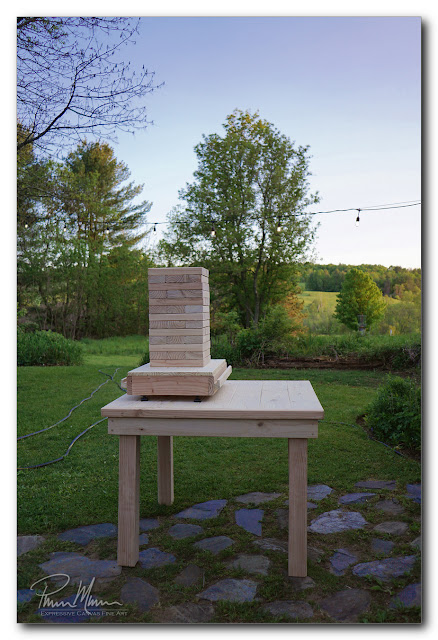
I 've been working on two small woodworking projects lately.  Well, they are what I would consider small projects but they are taking forever to finish! Everything in the photo, at right, has been sanded with 80 grit sandpaper followed by 120 grit sandpaper so I am making some progress.   As seen in the photo at right, I made a table for the backyard and I am making a Giant Jenga game.  Each of these small projects has required a lot of cutting and even more sanding. Giant Jenga will be played on the ground.  It is only sitting on the table for the photo, at right.  Actually, I wanted to keep the bare wood off the damp lawn so I placed everything on the new table.  All this wood in this photo still needs sanding with 220 grit sandpaper but that finish sanding with 220 grit should go quickly.   This photo only shows about two-thirds of the Giant Jenga pieces because I still need to sand the remaining third of pieces.  I ran out of energy ...