Posts

Quite the Lousy Night

U sually, my health worsens while I'm awake and, more often than not, when attempting to do things.  Any activity (ie, "doing things", raises my body core temperature and that is a significant trigger for poor health) is a major trigger for me as is straying from my long list of dietary restrictions and limits.  The temperature of my environment is also a big trigger.  Being in warm environments for more than 20 minutes or so is a problem.  Anyway, my health usually worsens during my waking hours.  Sometimes, however, for whatever reason (this is the unexplained, idiopathic part of this rare illness), poor health and sometimes even dangerously poor health is triggered while I am sleeping and the middle of the night last night was one of those nights.  Since the bedroom was only about 62° through the night, I know that a warm environment was not my trigger this time.  In this case, it seems it was simply an idiopathic triggering of poor health. I was ha...

Broken Telescope Tripod Fixed

Image
I 've been waiting for some new leg brackets to arrive from England so I could fix the tripod for my little Celestron CG-2 telescope mount.  One of the brackets that holds the legs in place broke about two weeks ago.  This mount is no longer available new so finding brackets was a bit of good luck!  (The new bracket can be seen in the photo at right.) I briefly contemplated just purchasing a newer and better manual mount to replace this broken one.  I had recently upgraded this little manual mount with a new saddle as well as installed ball bearings on both axes.  This upgrade project required a bit of time and effort.  I had cutting and grinding to do...  drilling and tapping to do...  and I had to find the exact right ball bearings to fit each axis.  After my upgrade, this mount was really working very well up until this little bracket broke.  Admittedly, having a newer and slightly better manual mount would be advantageous but, since ...

Sol Searcher

Image
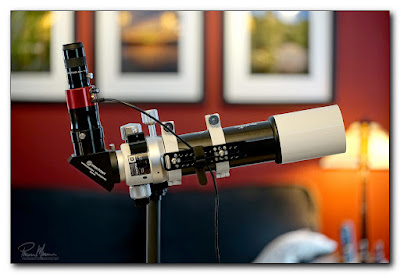
I had previously written about having problems finding the sun with my telescope while using a finder scope called the Sol Searcher.  I resorted to removing the Sol Searcher and going back to using my homemade solar finder scope instead.  My homemade solar finder scope works very well (pictured at right with the bullseye on the back end of it) but, when I'm using more than one telescope for solar astronomy, it is best to have a finder scope for each telescope.  I was hoping this little, lightweight Sol Searcher finder scope would be the ideal solution but I was quite disappointed until the other day.   When viewing the sun, your body is situated at the rear end of the telescope where the eyepiece is located.  You would naturally want to also view the solar finder scope from this position as well and that is what I was doing.  The problem is that when you are back behind the Sol Searcher finder scope, you cannot see where the sun is on the Sol Searcher...

Portable Solar Power

Image
M y newest solar filter requires a power supply.  It came with a cable and an AC adapter but, until I have built my observatory (hopefully this spring/summer), it is far easier to use a portable power supply.  Besides, the sun is behind trees all winter from where the observatory will be located so, depending on the time of day, I need to set up the telescope in a different location and I sometimes need to move the telescope as the sun moves behind more trees.  Portable power is an easier solution for this. The manufacturer offers a solar powered battery to use for this but the price seemed a bit high.  This filter is a bit of a power hog so it does need to be a relatively powerful battery.  That solar powered battery idea seemed like a great idea for powering a solar filter though.  This prompted me to look around online to see if I can find a more reasonably priced solar battery with the same specifications or better.   In the meantime, we have ...

A Beautiful Afternoon for Solar Astronomy

Image
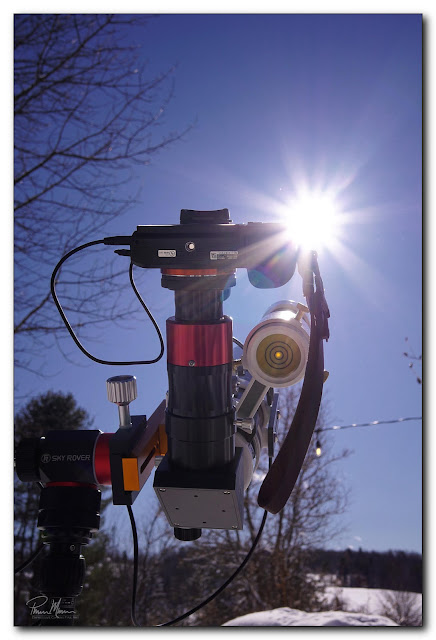
Y esterday afternoon was a little chilly but a beautiful afternoon for solar astronomy.  The sky was a deep blue, the distant mountaintops were crisp with no haze diminishing my view, and the temperature was a balmy 20° or so.  It was a great opportunity to spend a little more time with this new solar filter. I set up everything indoors and then moved everything to our mudroom/laundry room at the back door to make it easier moving everything outdoors.  I knew I wanted to attempt to capture some photos so I also had two cameras ready as well as a few lens choices.   You can clearly see in this first photo that it was a beautiful afternoon.  I don't think I've seen skies this clear in years! I was able to set up the telescope in an area where I had cleared snow the previous night.  This area of the backyard is very near our outdoor kitchen and the back door to the house so I had easy access to any additional equipment I might need from indoors. ...

An Aperture Mask

Image
I was evaluating a new solar filter on two separate mornings over the past week.  The views weren't as good as they could be.  These views were brighter than necessary and my research was indicating that reducing the aperture of the telescope might produce better results.  In particular, I was hoping to find a way to see more detail on the surface of the sun's chromosphere.  I always have some scrap lumber lying around so I went looking for a small scrap of 1/4" plywood.  I could cut a hole of the correct size and then cut out the outside diameter.  This would then fit inside the dew shield on my telescope.  The inside hole would provide the new, smaller aperture for the telescope. In this case, my intention was to cut a 60mm hole.  Unfortunately, the drill bit walked a bit when cutting so I screwed up the hole slightly.  Fortunately, I managed to salvage the project by making the hole a 63mm diameter hole instead.  This would change my...

Broken Telescope Tripod

Image
W hen I brought my telescope and mount outside the other day to do some solar observing, a leg bracket broke on my tripod as I was opening up the tripod legs.  This bracket holds the leg in place when it is in use and the tripod is useless with a broken bracket.  My day wasn't starting out too well. I wanted to use this particular telescope mount because it has slow motion control knobs.  These slow motion controls make it easier to keep the sun in the center of my view.  As I slowly turn one knob, the sun stays in the center of my view.  Now I had to move the telescope over to another small mount.  I went back to my new-ish Alt-Az manual mount.  I really wanted to use those slow motion controls for this session though so this was a bit of a letdown.  Having another thing break and added to my to-do list was an even bigger letdown.   As you can see in the photo, the tabs that hold the spreader bar snapped off.  I had fairly recently...

A Half Hour in Hydrogen Alpha

Image
The sun was shining this morning so, on my way to the bathroom for my morning cleanup and visit, I immediately turned on my new Ha (hydrogen alpha) solar filter so it could warm up.  This particular filter requires power to keep the etalon (interference filter) at the optimal temperature so I can see the most details.  The wavelength band varies very slightly by controlling the temperature of the etalon.  The more finely tuned the temperature setting, the more details you will see.  The filter requires about 10 minutes to warm up so I turned it on before washing up and brushing my teeth so it would be ready when I was ready for the day. I then headed out into the frigid single digit temperatures (just like the other morning) with the battery pack in my pocket and the telescope and mount in my hands.  I carefully made my way down to the end of the icy driveway where I have an unobstructed view of the sun quite low in the southeastern sky. I had far more success a...

Unexpected Solar Session

Image
W hen I got up this morning, I immediately noticed that the sun was shining through our windows.  It was very noticeable because this is not something we see all that often and especially not in the dead of winter when it is typically snowing every single day.  The sky appeared blue so it meant I should attempt a quick solar observing session with a new solar filter.  I had received this new filter a few days previously and was waiting for clear skies to use it for the first time. The temperature was in the single digits but there was no wind so I figured that the sun would help keep me warm.  I quickly dressed for the frigid outdoors and collected my astronomy gear.  I headed outdoors for a "first light" with this new filter. As expected with these sort of things, this session didn't go as planned.  It is often difficult to figure out the focus point for a new piece of equipment so I expected to have to play around with different configurations. ...

A Short Solar System Imaging Session

Image
M y previous two blog entries were about this same topic but with different images shot on the same day (earlier in the day during daylight) with the same equipment.  These few latest blog entries are about revisiting some older videos and images in an effort to understand a new software program meant for processing this type of imaging data.  This time around in this blog entry, I'll share the resulting images of some planets and our moon that Sheila and I observed that evening. In case you haven't yet read the couple of previous blog entries, these photos in this blog entry are from a short imaging session I had with Sheila back in November.  We observed the moon, Jupiter, Saturn and Venus.  I think we were only out there for less than a half hour but we came back into the house rather cold since it was a brisk 40 degrees or so.  That is about my limit on tolerating cold weather and, even then, I don't want to be out longer than a few minutes.  __________...