Posts

Another Very Productive Day

Image
T oday was another very productive day!  I am left in extreme pain but it was a very productive day. I ended up getting sunburned pretty badly but that doesn't seem to be painful.  Sheila thinks it will blister but, oddly enough, I'm not finding it all that painful at the moment.  It is uncomfortable but I wouldn't call it painful.  I'm thinking I got so sunburned because I may still be very sensitive and vulnerable to the sun after two antibiotic treatments for my tick bite in recent months.  The heat index today was at 102 degrees so it was definitely too hot out there to be doing anything physical as well as being prime sunburning weather.   The real pain is in my joints and my spine.  The pain is nearing an unbearable eight on the ten point pain scale.  I plan to take some AlevePM tonight so that should help me get some sleep by cutting the pain and making me drowsy.  This will also mean a down day tomorrow due to drowsiness but it is supposed to rain tomorrow anywa

Busy Productive Day

Image
F or a nice change, I had a very productive day today.  I was feeling relatively well...  just the typical quite painful spinal pain as well as some long-COVID breathing issues...  so, since I was feeling relatively well, I started my day at around 8am.   The first thing I did was to jump right into staining the backstops that I assembled last night for the new horseshoe pits.  I'm running quite low on stain so I had to mix two different colors but it looks "okay".  I would prefer a darker color like the rest of the outdoor wood on our property but it will be just fine. Sheila and I installed these backstops just before the sun set last night.  After installing them, we tossed a few horseshoes to see how the new horseshoe pits are doing.  Unfortunately, I quickly found that I'm not too happy with the quality of the horseshoe set I purchased.  The first thing I noticed is that the stakes are a bit skimpy.  Then I picked up one of the horseshoes and found that they are

Trestle Bridge Jig

Image
I started working on the trestle bridge for the garden railroad today.  Many years ago...  hmmm...  perhaps many decades ago...  I designed and built a small N scale trestle bridge.  This trestle bridge I am building now is a little different because it is so much larger.  This garden railroad trestle bridge will be approximately eight times larger in scale alone...  and far longer..  and far taller...  and on a sweeping compound curve.  That N scale bridge was tiny, short, and only a very mild curve...  I think I only needed to make four bents (trestles) while I am now needing 14 giant large scale bents that will take up a lot of space.   I ripped a bunch of wood on the table saw and then built a jig.  The jig will make it easy to accurately replicate each bent so they will all be the same.  The height of each will be different, however, because the ground slopes downward throughout this rather long compound curve.  I plan to cut each to its finished height on the table saw.  I will

Time To Add Detail Parts

Image
A fter deciding upon a track elevation for our garden railroad, I decided to see what the locomotive looks like on track at the specified elevation in the garden.   Here, below, is a front view.  I still need to install the marker lights.  I'm waiting on new light bulbs to arrive.  The original bulbs were only 6v bulbs (I think...  one blew out at around 9-10v) but it is easier to work with 12v bulbs.  The DCC circuit board I'm using outputs 12v for the lighting.  I could have added resistors to the 6v bulbs but preferred to keep all the bulbs in the locomotive the same.  Consequently, I have yet another delay because I'm now waiting on new bulbs to arrive. This weathering is looking pretty good now.  What used to be a shiny plastic, toy-like body with brightly molded-in color now appears to be a weathered metal locomotive.  And, I completely changed the color(s) to make this a very unique locomotive. I just noticed that the rear wheelset of the leading wheel truck is not

Garden Railroad Site Survey

Image
Y esterday, Sheila and I did a site survey for our proposed garden railroad.  Once we staked two known points (the straight-away) we were able to stake the rest of the points using basic geometry, a ruler, a level and a measuring tape.  Things are looking good for using this particular garden for this purpose. I plan to have a rather large wooden trestle bridge on one of the compound curves at one end of the garden.  This curve will be located around the tall growth shown in the photo at right.  This is the most visible curve on the layout so I figured it would be a great place for a feature such as this.  It borders the short path to the horseshoe pits and is visible from our firepit where we spend most of our time in the backyard.  As the trestle curves around to the right, the trestle gets taller in order to keep the track level over the downward sloping ground. We used some basic geometry to find specific locations of the track.  I have a scale printed plan of the layout so I took

Charging Jack

Image
T he first thing I did this morning was to install the charging jack into the tender.  The glue holding the mounting plate in place had dried overnight so it was secure enough to drill the hole and install the jack.  That was a quick and easy job this morning! This charging jack is located underneath the water hatch of the tender which allows me easy access to recharging the battery which will power the locomotive.  The jack has a rubber seal to keep water out of it in case I get caught by a surprise rain shower.  Actually, I'm a bit surprised that the rubber seal fits in this very small space.  It fits so I'm leaving it in place.   I still have not soldered any wires nor installed the DCC circuit board but the tender is now ready to be wired.  

Locomotive Electronics

Image
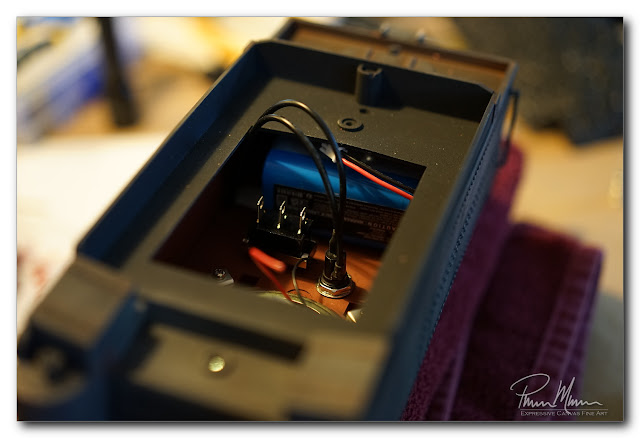
I 'm not feeling the greatest today so I opted to move to a different area of this locomotive project.  I'm not feeling well enough to be making decisions on weathering so I decided that was out pretty early this morning.  Anything requiring a judgement call is out of the question today so that eliminated any further weathering today.  This meant it was time to start working on something that has a pretty firm plan like getting the tender ready for all the electronics. Fortunately, there is plenty of room inside this tender for everything I will be adding to it.  This will make this conversion to battery power quite easy. First, I installed the big speaker for the sound.  Then I installed the fuse-holder and the On-Off-On switch.  Then I placed the battery inside the tender too to ensure I still have plenty of room for the DCC circuit board.  This circuit board is shockingly small so I know I have plenty of room it is just a matter of where I will position it inside this tender

Started Weathering

Image
M y large scale steam locomotive kitbash is still coming along.  This project is taking far longer than I anticipated but at least it is coming along nicely. Yesterday, I started the day by adding trim to the cab and then I spent the rest of the morning and into the afternoon continuing the weathering that I had previously started on the backhead of the cab.  This time, I was weathering the outside of locomotive and tender rather than just inside the cab.   I'm finding that getting the weathering just right is a delicate balance of differing subtle colors...  ie, rust, white discolored corrosion, and simple weathering of varying shades.  I find that I do a bit of weathering in one color and then I need to add other subtle colors to tone down what I had previously done.   Before I started weathering yesterday, I finished all I plan to do with the cab on this project.  The ceiling is done...  the cab is painted...  I installed trim on the windows...  details added...  cab details pai