Posts

Charging Jack

Image
T he first thing I did this morning was to install the charging jack into the tender.  The glue holding the mounting plate in place had dried overnight so it was secure enough to drill the hole and install the jack.  That was a quick and easy job this morning! This charging jack is located underneath the water hatch of the tender which allows me easy access to recharging the battery which will power the locomotive.  The jack has a rubber seal to keep water out of it in case I get caught by a surprise rain shower.  Actually, I'm a bit surprised that the rubber seal fits in this very small space.  It fits so I'm leaving it in place.   I still have not soldered any wires nor installed the DCC circuit board but the tender is now ready to be wired.  
Locomotive Electronics

Image
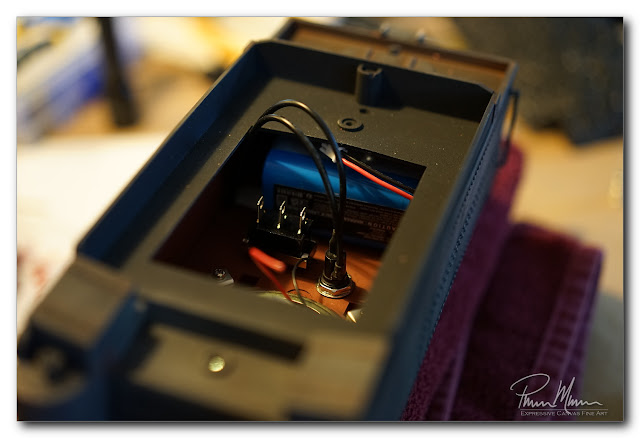
I 'm not feeling the greatest today so I opted to move to a different area of this locomotive project.  I'm not feeling well enough to be making decisions on weathering so I decided that was out pretty early this morning.  Anything requiring a judgement call is out of the question today so that eliminated any further weathering today.  This meant it was time to start working on something that has a pretty firm plan like getting the tender ready for all the electronics. Fortunately, there is plenty of room inside this tender for everything I will be adding to it.  This will make this conversion to battery power quite easy. First, I installed the big speaker for the sound.  Then I installed the fuse-holder and the On-Off-On switch.  Then I placed the battery inside the tender too to ensure I still have plenty of room for the DCC circuit board.  This circuit board is shockingly small so I know I have plenty of room it is just a matter of where I will posi...

Started Weathering

Image
M y large scale steam locomotive kitbash is still coming along.  This project is taking far longer than I anticipated but at least it is coming along nicely. Yesterday, I started the day by adding trim to the cab and then I spent the rest of the morning and into the afternoon continuing the weathering that I had previously started on the backhead of the cab.  This time, I was weathering the outside of locomotive and tender rather than just inside the cab.   I'm finding that getting the weathering just right is a delicate balance of differing subtle colors...  ie, rust, white discolored corrosion, and simple weathering of varying shades.  I find that I do a bit of weathering in one color and then I need to add other subtle colors to tone down what I had previously done.   Before I started weathering yesterday, I finished all I plan to do with the cab on this project.  The ceiling is done...  the cab is painted...  I installed trim on...

Locomotive Taking Shape

Image
M y large scale 4-6-0 steam locomotive has been disassembled into numerous piles of parts for more than a week, I think...  maybe it has been two weeks at this point.  I've completely lost track of time.  Today was the first day that provided the opportunity to assemble some of these parts again so I could see how things are coming along after repainting most parts and adding some detail parts.  The paint is dry enough now to assemble and disassemble the locomotive as necessary without the risk of ruining the paint job. In this first image, at right, there are some changes here other than the major change in color.  I've added marker lights to the front end of the locomotive (on each side of the headlight) and, for me, this is a big change to the appearance of the locomotive which will be even more noticeable when they are illuminated.  I've also replaced the standard tall cow catcher with a large timber bumper which, in my opinion, not only looks better bu...

Some Detail Painting

Image
I 've stayed indoors for the most part today.  We've had passing thunderstorms throughout the day today and the heat and humidity is high.  It is still bearable out there but I have no desire to be struck by lightning so I've stayed indoors and done some detail painting. (NOTE:  Later in the day, some severe thunderstorms passed through and the temperature dropped more than 20 degrees and stayed down around 70 degrees for the rest of the day!) For this model railroading project, I am really wanting a nice looking cab so I'm spending a little extra time on various parts of the cab.  Today, I worked a bit on detailing the backhead in the cab with paints and some extra parts.  Now that I see this photo, I can see that I still have a bit more work to do with detail brushes but this is looking great so far... I'm installing a new bell and a new whistle on this locomotive.  Here is the bell, below.  This bell came to me as an unpainted kit so I needed to pai...

Humidity and Bugs

E veryone seemed to have been complaining about the heat yesterday and television pseudo-weather forecasters clamoring about "record heat like we've never seen before".  Honestly, I'm very vulnerable to any heat above 80 degrees and I had few problems yesterday.  Actually, that record heat and relatively low humidity (in the 50s) was rather comfortable for the most part.  All the thunderstorms (some quite severe) bypassed Waterbury too.   Yesterday, the temperature was at a high of around 97 degrees (which was only for an hour or two late in the afternoon) but the humidity was only in the 53-60% range which made the heat quite tolerable.  That may be a record for mid-June, I suppose, but we regularly get into the triple digits in July so being in the 90s in June doesn't really seem so far-fetched nor highly unlikely.    In fact, my birthday barbeques which are always the last weekend in June or first weekend in July are often brutally and uncomfor...

Another Few Coats of Paint

Image
I 've spent the past few days adding more coats of paint to my locomotive project.  This is a large scale steam locomotive so it is a very large model and it is requiring a lot more paint than I expected.  I've been delayed while waiting on paint to arrive (the USPS is dog-slow lately).  Regardless of a few little problems, this project is slowly coming along. A couple of days ago, I painted everything using Krylon Anvil Gray.  I was hoping for a charcoal neutral color but this Anvil Gray turned out to be more closely resembling something I would call Midnight Blue.  Midnight Blue was definitely not in my plan for this project so I had to order a different color (and wait a bit longer for it to finally arrive).  I couldn't find a gray tone that I liked because they were all too light in tone so I settled for a flat black.  I plan to weather this locomotive so starting with a neutral black will work even though my preference was for a neutral dark gray/...